Pfaff quilt ambition 630 Manual - Page 28
Operating your ambition™ 620, Buttons and Indicators, Graphic Display
 |
View all Pfaff quilt ambition 630 manuals
Add to My Manuals
Save this manual to your list of manuals |
Page 28 highlights
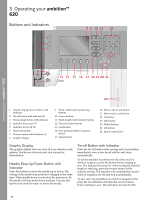
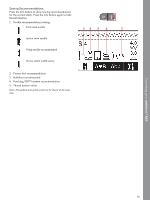
3 Operating your ambition™ 620 Buttons and Indicators Operating your ambition™ 620 1. Needle stop up/down button with indicator 2. Tie-off button with indicator (5) 3. Thread snips button with indicator 4. Indicator for reverse (7) 5. Indicator for tie-off (2) 6. Start/stop button 7. Reverse button with indicator (4) 8. Graphic display 9. Stitch width/stitch positioning buttons 10. Cursor buttons 11. Stitch length/stitch density buttons 12. Direct selection buttons 13. Load button 14. Save personal stitch or sequence button 15. Delete button 16. Mirror side to side button 17. Mirror end to end button 18. Alt button 19. Info button 20. Wheel buttons 21. OK button 22. Speed control lever Graphic Display The graphic display lets you view all your selections and options. Stitches are shown in real size (except for buttonholes). Needle Stop Up/Down Button with Indicator Press this button to move the needle up or down. The setting of the needle stop position is changed at the same time. When needle down is activated, the indicator is lit, the needle will stop in the down position. You can also tap the foot control to raise or lower the needle. Tie-off Button with Indicator Press the tie-off button while sewing and your machine immediately sews a few tie-off stitches and stops automatically. To set the machine to perform tie-off at the end of a stitch or sequence, press the button before starting to sew. The indicator becomes lit. After sewing the desired length of stitching, press the reverse button while actively sewing. The machine will complete the current stitch or sequence, tie-off and stop automatically. To sew only one repetition of a stitch or sequence, first press the tie-off button and then the reverse button before starting to sew. The indicators become lit. The 28
-
 1
1 -
2
-
3
-
4
-
5
-
6
-
7
-
8
-
9
-
10
-
11
-
12
-
13
-
14
-
15
-
16
-
17
-
18
-
19
-
20
-
21
-
22
-
 23
23 -
 24
24 -
 25
25 -
 26
26 -
 27
27 -
 28
28 -
 29
29 -
 30
30 -
 31
31 -
 32
32 -
 33
33 -
34
-
35
-
36
-
37
-
38
-
39
-
40
-
41
-
42
-
43
-
44
-
45
-
46
-
47
-
48
-
49
-
50
-
51
-
52
-
53
-
54
-
55
-
56
-
57
-
58
-
59
-
60
-
61
-
62
-
63
-
64
-
65
-
66
-
67
-
68
 |
 |
