Pfaff quilt ambition 630 Manual - Page 42
Start/Stop Button, Reverse Button with Indicator, Speed Control Lever, Settings Menu, Thread Tension
 |
View all Pfaff quilt ambition 630 manuals
Add to My Manuals
Save this manual to your list of manuals |
Page 42 highlights
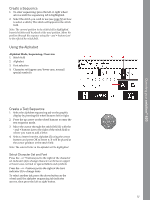
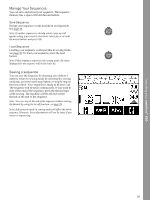
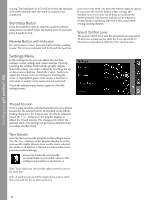
Operating your quilt ambition™ 630 sewing. The indicators (3 & 5) will be lit and the machine will cut the threads after the stitch or sequence has completed. Start/Stop Button Press this button to start or stop the machine without using the foot control. Press the button once to start and press it again to stop. Reverse Button with Indicator For permanent reverse, press the button before starting to sew. The reverse indicator will be lit and the machine sews in reverse until you press the button again to cancel. If you press the reverse button while sewing, the machine sews in reverse for as long as you keep the button pressed. The reverse indicator is lit when the reverse button is pressed. Reverse is also used when sewing darning stitches. Speed Control Lever The speed control lever sets the maximum sewing speed. To increase sewing speed, slide the lever upwards, to decrease sewing speed, slide the lever downwards. Settings Menu In the settings menu, you can adjust the machine settings, sound settings and screen settings. Open by touching the settings button in the graphic display. Select the setting you wish to adjust by touching the up or down arrow buttons. Touch the + and - buttons to adjust the values. Activate settings by touching the circle. A highlighted green circle means a function is activated, an empty circle means it is not activated. Touch the settings menu button again to close the settings menu. Thread Tension Your sewing machine will electronically pre-set a thread tension for the selected stitch. Depending on the fabric, batting, thread etc, the tension may need to be adjusted. Touch the + or - buttons on the graphic display to adjust the thread tension. The changes only affect the selected stitch. The setting will go back to default when you select another stitch. Twin Needle Activate the twin needle program in the settings menu. Use the + or - buttons on the graphic display to set the twin needle width. When a twin needle size is selected, the width of all stitches is limited for that needle size to prevent needle breakage. In sewing mode, the twin needle recommendation icon will be shown. The setting is kept until you deactivate it. Note: Twin needle and stitch width safety cannot be used at the same time. Note: A warning pop-up will be shown if you select a stitch that is too wide for the set twin needle size. 42
-
 1
1 -
2
-
3
-
4
-
5
-
6
-
7
-
8
-
9
-
10
-
11
-
12
-
13
-
14
-
15
-
16
-
17
-
18
-
19
-
20
-
21
-
22
-
23
-
24
-
25
-
26
-
27
-
28
-
29
-
30
-
31
-
32
-
33
-
34
-
35
-
36
-
 37
37 -
 38
38 -
 39
39 -
 40
40 -
 41
41 -
 42
42 -
 43
43 -
 44
44 -
 45
45 -
 46
46 -
 47
47 -
48
-
49
-
50
-
51
-
52
-
53
-
54
-
55
-
56
-
57
-
58
-
59
-
60
-
61
-
62
-
63
-
64
-
65
-
66
-
67
-
68
 |
 |