Philips DVDR3576H User manual - Page 55
Press [STOP
 |
UPC - 609585155206
View all Philips DVDR3576H manuals
Add to My Manuals
Save this manual to your list of manuals |
Page 55 highlights
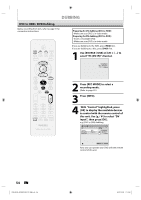
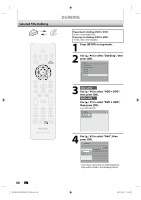
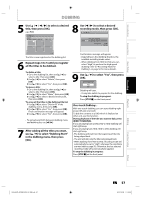
Introduction Connections Basic Setup DUBBING 5 Press [PLAY B] to start playing back the DVC, and find the point where you wish to start dubbing. Press [STOP C] when you come to the desired start point. 6 Use [K / L] to select "Start Rec", then press [OK]. The dubbing will start. To stop dubbing; 1) Use [K / L] to select "Control", then press [OK]. 2) Use [K / L] to select "HDD" or "DVD" (whichever the recording component you are using), then press [OK]. 3) Press [STOP C]. Note for DV dubbing • If you press [PAUSE F] at step 5, the tape will rewind to the point a few seconds preceding the paused point when you press [OK] at step 6, then, it will start dubbing when it comes to the paused point. • The unit does not send out the output signal to DVC. • For the proper operation, connect DVC to the unit directly. Do not connect this unit and DVC via any other unit. • Do not connect more than 1 DVC. • The unit can only accept DVC. Other DV device such as cable/satellite box or D-VHS VCR cannot be recognized. • If no video signal is detected from the DVC during DVC to HDD / DVD dubbing, the recording will be paused and "I" will flash on the TV screen. The recording will resume when the unit detects the video signal again. • When the DVC is in camera mode, refer to "Guide to DV and On-Screen Display" on page 53. • Date / time and cassette memory data will not be recorded. • Pictures with a copy-guard signal cannot be recorded. • A DV terminal is a terminal that can use the transmission mode conforming to the IEEE 1394 standards called "Fire Wire". It enables digital dubbing between DV devices with little degradation. • You cannot dub from DVC to the both HDD and DVD at the same time. Recording Playback Editing Function Setup Others E2H42UD_DVDR3576H-37_EN.indd 55 EN 55 2007/12/28 11:15:23
-
 1
1 -
2
-
3
-
4
-
5
-
6
-
7
-
8
-
9
-
10
-
11
-
12
-
13
-
14
-
15
-
16
-
17
-
18
-
19
-
20
-
21
-
22
-
23
-
24
-
25
-
26
-
27
-
28
-
29
-
30
-
31
-
32
-
33
-
34
-
35
-
36
-
37
-
38
-
39
-
40
-
41
-
42
-
43
-
44
-
45
-
46
-
47
-
48
-
49
-
 50
50 -
 51
51 -
 52
52 -
 53
53 -
 54
54 -
 55
55 -
 56
56 -
 57
57 -
 58
58 -
 59
59 -
 60
60 -
61
-
62
-
63
-
64
-
65
-
66
-
67
-
68
-
69
-
70
-
71
-
72
-
73
-
74
-
75
-
76
-
77
-
78
-
79
-
80
-
81
-
82
-
83
-
84
-
85
-
86
-
87
-
88
-
89
-
90
-
91
-
92
-
93
-
94
-
95
-
96
-
97
-
98
-
99
-
100
-
101
-
102
-
103
-
104
-
105
-
106
-
107
-
108
-
109
-
110
-
111
-
112
-
113
-
114
-
115
-
116
-
117
-
118
-
119
-
120
-
121
-
122
-
123
-
124
 |
 |
