Philips LC3136 User Manual - Page 11
Set up
 |
View all Philips LC3136 manuals
Add to My Manuals
Save this manual to your list of manuals |
Page 11 highlights
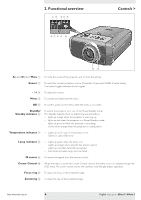
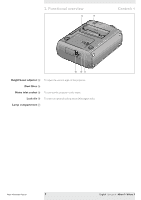
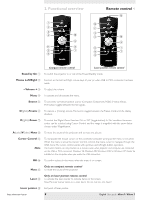
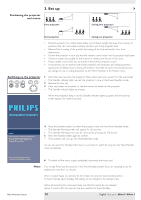
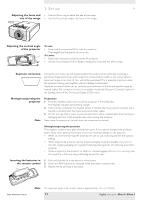
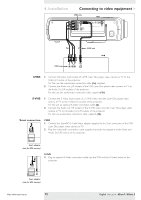
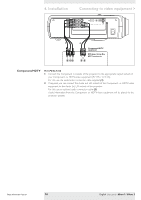
3. Set up > Adjusting the focus and size of the image Zoom ring Focus ring • Use the Zoom ring to adjust the size of the image. • Use the Focus ring to adjust the focus of the image. Adjusting the vertical angle of the projector S-Video Pr R YG Pb B Data Video Audio L Audio R Audio in Data USB PS/2 A B To raise: • Keep knob A pressed and lift to raise the projector. - The Height/Level Adjuster B will come out. To Lower: • Keep knob A pressed and gently lower the projector. • Use the Focus Ring and Zoom Ring to readjust the focus and size of the image. Keystone correction If projector and screen are not properly placed, the picture will be distorted, producing a keystoned image (picture top width larger than picture bottom width or vice versa). When a keystoned image occurs the 4:3 ratio will still be guaranteed.This is especially important when the projector is being used together with an 'intelligent whiteboard'. 'Keystone correction' allows you to correct picture distortion of the vertical keystone type by internal scaling.This correction function is accessible through the 'Keystone Correction' option in the 'Settings' menu of the On Screen Display (OSD) menu. Moving/transporting the projector Note Preparation 1 Press the Standby button twice to put the projector in Power/Standby. - The Standby indicator starts blinking orange. 2 Wait until the cooling fan has stopped (about 3 minutes after the projector has been put in Standby) and disconnect the mains lead and all other cables. 3 Put the lens cap back in place to prevent dust, dirt or other contamination from harming or damaging the front of the projector lens when moving the projector. Never place the projector on the side where the connections are located. Moving/transporting the projector The projector contains many glass and precision parts. If you need to transport the projector, please follow these packing instructions to pervent accidental damage to the projector. • When you are hand-carrying the projector, be sure to use a carrying case like the optional softbag. • When shipping the projector, use the original packaging material if possible. If you do not have the original packaging, use equivalent materials, placing plenty of cushioning around the projector. • When transporting the projector as freight or checked luggage, first put it in a carrying case, then pack it in a firm box, using cushioning around the case. Inserting the batteries in the remote control 1 Push and slide the lid in the direction of the arrow. 2 Install two 'AAA' batteries as indicated inside the battery compartment. 3 Replace the lid and snap it into place. Philips Multimedia Projector Note The maximum range of the remote control is approximately 15 m (± 50 feet). 11 English User guide bSure1 / bSure 2
-
 1
1 -
2
-
3
-
4
-
5
-
 6
6 -
 7
7 -
 8
8 -
 9
9 -
 10
10 -
 11
11 -
 12
12 -
 13
13 -
 14
14 -
 15
15 -
 16
16 -
17
-
18
-
19
-
20
-
21
-
22
-
23
-
24
-
25
-
26
-
27
-
28
-
29
-
30
-
31
-
32
-
33
-
34
 |
 |
