Pioneer AVH-X8500BHS Owner's Manual - Page 42
Setting SiriusXM Tune Start, Setting Demo Mode - rear view camera
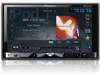 |
View all Pioneer AVH-X8500BHS manuals
Add to My Manuals
Save this manual to your list of manuals |
Page 42 highlights
Section 19 System settings System settings # With some rear view cameras, picture adjustment may not be possible. 2 Touch the system key to open the system menu. 5 Touch c or d to adjust the selected item. Each time you touch c or d, the level of the selected item increases or decreases. # Dimmer can be adjusted from +1 to +48. # Temperature can be adjusted from +3 to -3. Notes ! You cannot operate this function while driv- ing. ! Different Brightness/Contrast/Dimmer set- tings can be set for when the illumination switch is on and when it is off. 3 Touch System Language on the system menu to select the desired language. 4 Touch the desired language. English (English)-Français (French)-Español (Spanish)-Portuguese (Portuguese)-中文 (Simplified Chinese) Setting SiriusXM Tune Startä Refer to Setting SiriusXM Tune Startä on page 16. Selecting the system language The system language can be selected. If text information such as the title name, artist name or a comment is embedded in a European language, they can also be displayed on this unit. ! The language can be changed for the follow- ing: - Audio menu - System menu - Video Setup menu - Bluetooth menu - Language for cautions Some operations on this unit are prohibited from use while driving or require careful attention when operated. In such cases, a caution will appear on the display. You can change the language for caution messages with this setting. ! If the embedded language and the selected language setting are not the same, text information may not display properly. ! Some characters may not be displayed properly. 1 Press the home button to switch to the home display. Setting Demo Mode Once Demo Mode is turned on, the Demo screen appears. Refer to Demo mode on page 6. 1 Press the home button to switch to the home display. 2 Touch the system key to open the system menu. 3 Touch Demo mode on the system menu to turn Demo mode on or off. ! On - The Demo screen appears. ! Off - The Demo screen does not appear. Switching sound muting/ attenuation Sound from this system is automatically muted or attenuated when a signal from equipment with a mute function is received. ! Sound from this system returns to normal when the muting or attenuation is canceled. 42 En 1 Press the home button to switch to the home display. 3 Touch the system key to open the system menu. 2 Touch the system key to open the system menu. 3 Touch Mute/ATT until the desired setting appears. Touch Mute/ATT until the desired setting appears in the display. ! Mute - Muting ! ATT -20dB - Attenuation (ATT -20dB has a stronger effect than ATT -10dB) ! ATT -10dB - Attenuation ! Off - Turns the sound muting/attenuation off Notes ! When Mute is displayed, the sound is turned off and no audio adjustments can be made. ! When ATT is displayed, the sound is attenu- ated and only the volume can be adjusted. (No other audio adjustments can be made.) ! Operation returns to normal when the phone connection is ended. 4 Touch Rear Speaker on the system menu to switch the subwoofer output or full-range speaker. # When no subwoofer is connected to the rear output, select Full (full-range speaker). # When a subwoofer is connected to the rear output, select Subwoofer (subwoofer). Notes ! Even if you change this setting, there will be no output unless you turn the subwoofer output on (refer to Using subwoofer output on page 37). ! Both rear speaker lead outputs and RCA rear output are switched simultaneously in this setting. Setting the Tag forwarding Song information (tag) can be saved from the HD Radio station to your iPod. Setting the rear output and subwoofer controller This unit's rear output (rear speaker leads output and RCA rear output) can be used for fullrange speaker (Full) or subwoofer (Subwoofer) connection. If you switch the rear output setting to Subwoofer, you can connect a rear speaker lead directly to a subwoofer without using an auxiliary amp. Initially, the unit is set for a rear full-range speaker connection (Full). 1 Turn the source off. Refer to Turning the source ON/OFF on page 8. 1 Press the home button to switch to the home display. 2 Touch the system key to open the system menu. 3 Touch Tag forwarding on the system menu to turn USB1 or USB2. Using the keyboard Keyboard is available only in AppRadio Mode. Refer to Setting the Keyboard on page 25. 2 Press the home button to switch to the home display.
-
 1
1 -
2
-
3
-
4
-
5
-
6
-
7
-
8
-
9
-
10
-
11
-
12
-
13
-
14
-
15
-
16
-
17
-
18
-
19
-
20
-
21
-
22
-
23
-
24
-
25
-
26
-
27
-
28
-
29
-
30
-
31
-
32
-
33
-
34
-
35
-
36
-
 37
37 -
 38
38 -
 39
39 -
 40
40 -
 41
41 -
 42
42 -
 43
43 -
 44
44 -
 45
45 -
 46
46 -
 47
47 -
48
-
49
-
50
-
51
-
52
-
53
-
54
-
55
-
56
-
57
-
58
-
59
-
60
-
61
-
62
-
63
-
64
-
65
-
66
-
67
-
68
-
69
-
70
-
71
-
72
-
73
-
74
-
75
-
76
-
77
-
78
-
79
-
80
-
81
-
82
-
83
-
84
-
85
-
86
-
87
-
88
-
89
-
90
-
91
-
92
-
93
-
94
-
95
-
96
-
97
-
98
-
99
-
100
-
101
-
102
-
103
-
104
-
105
-
106
-
107
-
108
-
109
-
110
-
111
-
112
-
113
-
114
-
115
-
116
-
117
-
118
-
119
-
120
-
121
-
122
-
123
-
124
-
125
-
126
-
127
-
128
-
129
-
130
-
131
-
132
-
133
-
134
-
135
-
136
-
137
-
138
-
139
-
140
-
141
-
142
-
143
-
144
-
145
-
146
-
147
-
148
-
149
-
150
-
151
-
152
-
153
-
154
-
155
-
156
-
157
-
158
-
159
-
160
-
161
-
162
-
163
-
164
-
165
-
166
-
167
-
168
-
169
-
170
-
171
-
172
-
173
-
174
-
175
-
176
-
177
-
178
-
179
-
180
-
181
-
182
-
183
-
184
-
185
-
186
-
187
-
188
-
189
-
190
-
191
-
192
-
193
-
194
-
195
-
196
-
197
-
198
-
199
-
200
-
201
-
202
-
203
-
204
-
205
-
206
-
207
-
208
-
209
-
210
-
211
-
212
-
213
-
214
-
215
-
216
-
217
-
218
-
219
-
220
-
221
-
222
-
223
-
224
-
225
-
226
-
227
-
228
 |
 |
