Pioneer DEH-X9500BHS Owner's Manual - Page 19
SiriusXM Satellite Radio - install
 |
View all Pioneer DEH-X9500BHS manuals
Add to My Manuals
Save this manual to your list of manuals |
Page 19 highlights
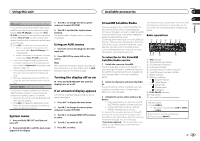
Using this unit Available accessories Section 02 English S/W control (rear output and subwoofer setting) This unit's rear output (rear speaker leads output and RCA rear output) can be used for full-range speaker (Rear SP :F.Range) or subwoofer (Rear SP :S/W) connection. If you switch the rear output setting to Rear SP :S/W, you can connect a rear speaker lead directly to a subwoofer without using an auxiliary amp. 1 Press M.C. to switch the rear output setting. ! When no subwoofer is connected to the rear output, select Rear SP :F.Range (fullrange speaker). ! When a subwoofer is connected to the rear output, select Rear SP :S/W (subwoofer). ! Even if you change this setting, there will be no output unless you turn the subwoofer output on (refer to Subwoofer1 (subwoofer on/off setting) on page 15). ! If you change this setting, subwoofer output in the audio menu will return to the factory settings. ! Both rear speaker lead outputs and RCA rear output are switched simultaneously in this setting. Software Update (updating the software) This function is used to update this unit with the latest Bluetooth software. For about Bluetooth software and updating, refer to our website. ! Never turn the unit off while the Bluetooth soft- ware is being updated. 1 Press M.C. to display the data transfer mode. Follow the on-screen instructions to finish updating the Bluetooth software. 3 Turn M.C. to change the menu option and press to select SYSTEM. 4 Turn M.C. to select the system menu function. For details, refer to System menu on the previous page. Using an AUX source 1 Insert the stereo mini plug into the AUX input jack. 2 Press SRC/OFF to select AUX as the source. Note AUX cannot be selected unless the auxiliary setting is turned on. For more details, refer to AUX (auxiliary input) on the previous page. Turning the display off or on % Press and hold MIX/DISP OFF until the display turns on or off. If an unwanted display appears Turn off the unwanted display using the procedures listed below. 1 Press M.C. to display the main menu. 2 Turn M.C. to change the menu option and press to select SYSTEM. System menu 1 Press and hold SRC/OFF until the unit turns off. 2 Press and hold M.C. until the main menu appears in the display. 3 Turn M.C. to display DEMO OFF and press to select. 4 Turn M.C. to switch to YES. 5 Press M.C. to select. 03 SiriusXM Satellite Radio You can use this unit to control SiriusXM Connect Vehicle Tuner, which is sold separately. For more information on how to install SiriusXM Connect Vehicle Tuner, consult the installation guide included with the tuner. Everything worth listening to is on SiriusXM, getting over 130 channels, including the most commercial‐free music, plus the best sports, news, talk and entertainment. A SiriusXM Vehicle Tuner and Subscription are required. For more information, visit www.siriusxm.com. To subscribe to the SiriusXM Satellite Radio service 1 Switch the source to SiriusXM. You should be able to tune in to Channel 1. If you cannot get Channel 1, make sure that your SiriusXM Connect Vehicle Tuner is installed correctly as described in the tuner installation guide. 2 Switch to Channel 0 and check the Radio ID. You will need this number to activate your subscription. For details, refer to Displaying the Radio ID on the next page. 3 Activate the service either online or by phone. ! Go to www.siriusxm.com, and click on ACTIVATE RADIO to start the activation process. ! Call SiriusXM Listener Care at 1-800-XMRADIO (1-866-635-2349) to activate. # As part of the activation process, the SiriusXM satellites will send an activation message to your SiriusXM Connect Vehicle Tuner. Once the tuner has received the message, this unit will display "Subscription Updated -". Once the update is completed, you can start tuning in to the channels in your subscription. The activation process usually takes 10 to 15 minutes but may take up to an hour in some cases. Do not turn off the unit while the activation message is displayed. Basic operations 1 2 3 4 5 67 89 a b 1 TAG indicator 2 Tags transferring indicator 3 SiriusXM band indicator 4 Scan play indicator 5 SiriusXM channel number indicator 6 SiriusXM preset number indicator 7 Replay indicator 8 Title icon indicator - (Channel Name) - (Artist Name) - (Song Title) - (Content Info) - (Category) 9 PLAY/PAUSE indicator a Progress bar b Time until the live broadcast starts Selecting a band 1 Press BAND/ . ! Band can be selected from SXM-1, SXM-2 or SXM-3. Returning to the current live broadcast 1 Press and hold BAND/ . En 19
-
 1
1 -
2
-
3
-
4
-
5
-
6
-
7
-
8
-
9
-
10
-
11
-
12
-
13
-
 14
14 -
 15
15 -
 16
16 -
 17
17 -
 18
18 -
 19
19 -
 20
20 -
 21
21 -
 22
22 -
 23
23 -
 24
24 -
25
-
26
-
27
-
28
-
29
-
30
-
31
-
32
-
33
-
34
-
35
-
36
-
37
-
38
-
39
-
40
-
41
-
42
-
43
-
44
-
45
-
46
-
47
-
48
-
49
-
50
-
51
-
52
-
53
-
54
-
55
-
56
-
57
-
58
-
59
-
60
-
61
-
62
-
63
-
64
-
65
-
66
-
67
-
68
-
69
-
70
-
71
-
72
-
73
-
74
-
75
-
76
-
77
-
78
-
79
-
80
-
81
-
82
-
83
-
84
-
85
-
86
-
87
-
88
-
89
-
90
-
91
-
92
-
93
-
94
-
95
-
96
-
97
-
98
-
99
-
100
-
101
-
102
-
103
-
104
 |
 |