Pioneer DV-AX10 Owner's Manual - Page 17
Digital Audio Connections
 |
View all Pioneer DV-AX10 manuals
Add to My Manuals
Save this manual to your list of manuals |
Page 17 highlights
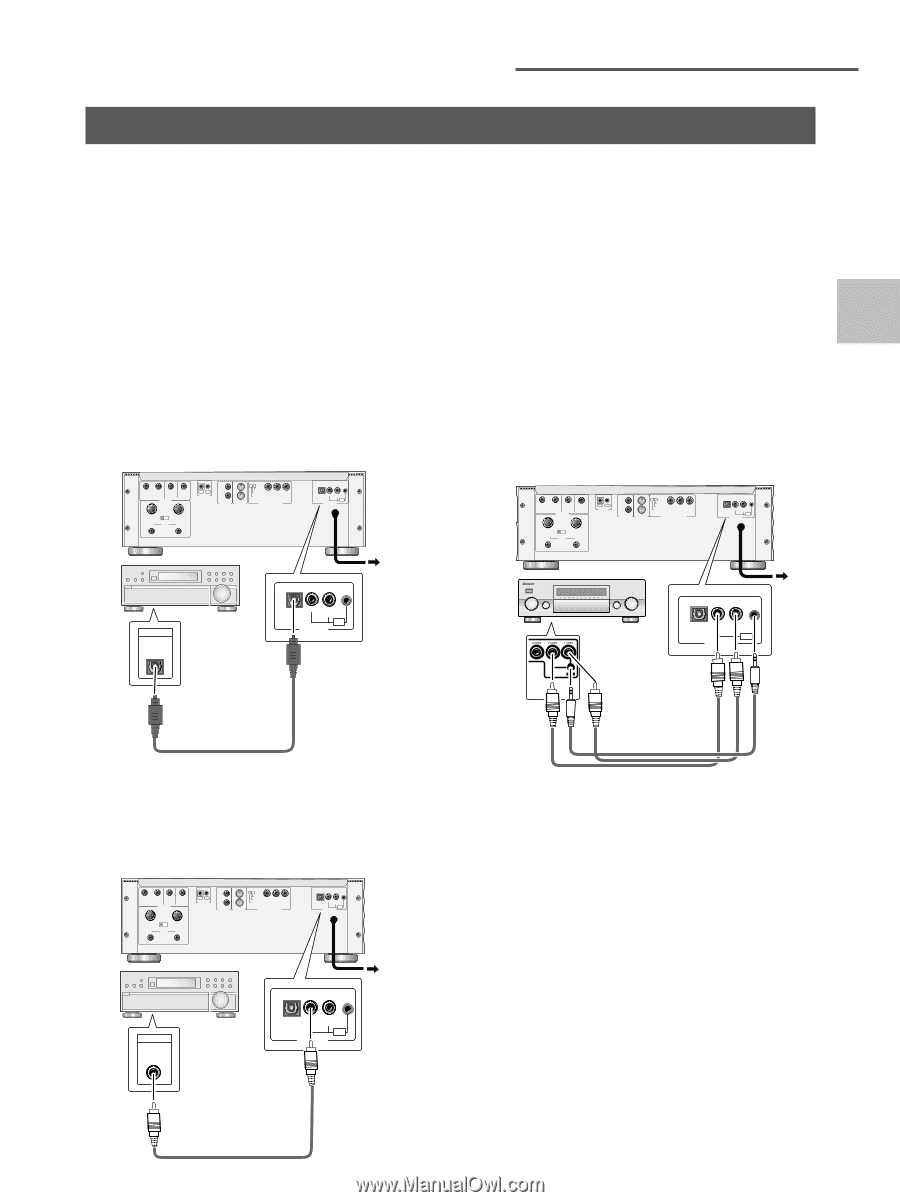
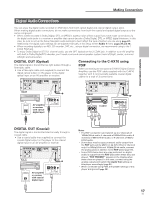
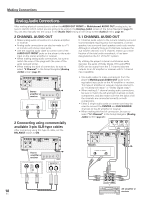
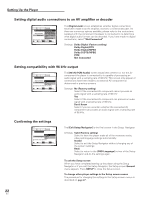
Making Connections Digital Audio Connections You can enjoy the digital audio recorded on DVD discs from both optical digital and coaxial digital output jacks. When making digital audio connections, do not make connections from both the coaxial and optical digital outputs to the same component. • When a DVD recorded in Dolby Digital, DTS, or MPEG is loaded, noise will be output if you have made connections via the digital audio jacks to a receiver or amplifier that cannot decode a Dolby Digital, DTS, or MPEG digital bitstream. In this case, be sure to set up the Setup Navigator audio settings to best reflect the type of system you are using (page 22). Additionally, the digital audio settings can be adjusted manually in the Setup screen Audio 1 menu (pages 29 and 30). • When recording digitally to an MD, CD recorder, DAT, etc., using a digital connection, we recommend using to the 1 COAX PCM jack. • To enjoy Dolby Digital or DTS 5.1 channel audio, use the OPT (optical) or the 2 COAX jack. In addition to an AV amplifier with built-in Dolby Digital/DTS decoder, you'll need a surround sound speaker system (main left/right, center, surround left/right and subwoofer). DIGITAL OUT (Optical) The digital signal is transmitted as light pulses through a fiber-optic cable. • Use a fiber-optic cable (not supplied) to connect the digital optical output on the player to the digital optical input on an AV amplifier or receiver. Connecting to the C-AX10 using PDIF When connecting to the optional C-AX10 Digital Control Amplifier, use the PDIF cable supplied with the C-AX10 together with 2 commercially available coaxial digital cables for a total of 3 connections. R L SURROUND SUB WOOFER AUDIO OUT 1 - GND 2 - HOT (+) 3 - COLD (-) BALANCE OFF ON CENTER R FRONT L IN OUT CONTROL 1 1 2 VIDEO OUT 2 S-VIDEO OUT menu select 525i (480i) 525p (480p) PR PB Y COMPONENT VIDEO OUT OPT 2COAX 1COAX PCM PDIF DIGITAL OUT R L SURROUND SUB WOOFER AUDIO OUT 1 - GND 2 - HOT (+) 3 - COLD (-) BALANCE OFF ON CENTER R FRONT L IN OUT CONTROL 1 1 2 VIDEO OUT 2 S-VIDEO OUT menu select 525i (480i) 525p (480p) PR PB Y COMPONENT VIDEO OUT OPT 2COAX 1COAX PCM PDIF DIGITAL OUT MAKING CONNECTIONS DIGITAL IN AV amplifier or receiver with optical digital input OPT 2COAX 1COAX PCM PDIF DIGITAL OUT C-AX10 OPT 2COAX 1COAX PCM PDIF DIGITAL OUT DIGITAL OUT (Coaxial) The digital signal is transmitted electronically through a coaxial cable. • Use a coaxial cable (not supplied) to connect the coaxial digital output on the player to the coaxial digital input on an AV amplifier or receiver. R L SURROUND SUB WOOFER AUDIO OUT 1 - GND 2 - HOT (+) 3 - COLD (-) BALANCE OFF ON CENTER R FRONT L IN OUT CONTROL 1 1 2 VIDEO OUT 2 S-VIDEO OUT menu select 525i (480i) 525p (480p) PR PB Y COMPONENT VIDEO OUT OPT 2COAX 1COAX PCM PDIF DIGITAL OUT DIGITAL IN AV amplifier or receiver with coaxial digital input OPT 2COAX 1COAX PCM PDIF DIGITAL OUT Notes • The PDIF connection can transmit up to 2 channels of 192kHz/24-bit audio; 4 channels of 96kHz/24-bit audio; 6 channels of 96kHz/16-bit audio; or 6 channels of 48kHz/ 24-bit audio. • Some discs may be copy protected: audio output from the PDIF jacks will be 48kHz or 44.1kHz/16-bit (2 channel) only. For 96kHz/24-bit and 192kHz/24-bit audio, connect the analog jacks in addition to the PDIF jacks (page 18). • Some DVD-Audio discs are copy protected: no digital audio is output from the PDIF jacks when these discs are played. "PDIF PROHIBIT" appears in the display when these discs are played. In this case, connect using the analog outputs and switch the [Audio Out] setting on this player accordingly (page 31). • When connected using PDIF, the speaker settings of this player are ignored (page 32). 17 En
-
 1
1 -
2
-
3
-
4
-
5
-
6
-
7
-
8
-
9
-
10
-
11
-
 12
12 -
 13
13 -
 14
14 -
 15
15 -
 16
16 -
 17
17 -
 18
18 -
 19
19 -
 20
20 -
 21
21 -
 22
22 -
23
-
24
-
25
-
26
-
27
-
28
-
29
-
30
-
31
-
32
-
33
-
34
-
35
-
36
-
37
-
38
-
39
-
40
-
41
-
42
-
43
-
44
-
45
-
46
-
47
-
48
-
49
-
50
-
51
-
52
-
53
-
54
-
55
-
56
-
57
-
58
-
59
-
60
-
61
-
62
-
63
-
64
-
65
-
66
-
67
-
68
-
69
-
70
-
71
-
72
-
73
-
74
-
75
-
76
 |
 |