Pioneer DV-AX10 Owner's Manual - Page 27
Adjusting Audio and Video Settings
 |
View all Pioneer DV-AX10 manuals
Add to My Manuals
Save this manual to your list of manuals |
Page 27 highlights
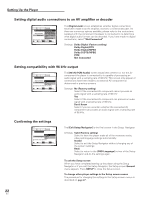
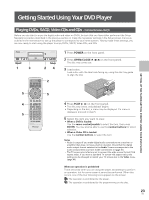
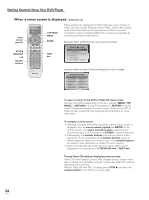
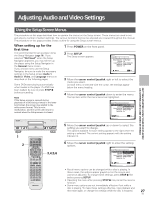
Adjusting Audio and Video Settings Adjusting Audio and Video Settings Using the Setup Screen Menus The procedure on this page describes how to operate the menus on the Setup screen. These menus are used to set and adjust a number of system settings. The various functions that can be adjusted are covered throughout this manual. The procedure on this page provides a basic outline for using the Setup screen menus. When setting up for the first time It is recommended to set up player using the Setup Navigator (page 19). If you selected "Not Used" when the Setup Navigator appeared, you may still set up the player using the Setup Navigator in the General menu screen. If you choose not to use the Setup Navigator, be sure to make the necessary settings in the Setup screen Audio 1, Audio 2, Video, and Language menus as described on the following pages. Some DVDs start playing automatically when loaded in the player. If a DVD has been loaded, be sure to press STOP 7 before proceeding. Note If the Setup screen is opened during playback of a DVD being viewed in the letter box format, the screen may switch to the wide screen format. This is not a malfunction, and the screen will return to normal when the Setup screen is closed. 1 Press POWER on the front panel. 2 Press SETUP. The Setup screen appears. Audio1 2 Video Language General Dolby Digital Out - Dolby Digital DTS Out - Off Linear PCM Out - Down Sample On MPEG Out - MPEG 3 PCM Digital Out - On Move SETUP Exit 3 Move the cursor control joystick right or left to select the menu you want. As each menu is selected with the cursor, the settings appear below the menu heading. 4 Move the cursor control joystick down to enter the menu. The top item within the menu becomes highlighted. Audio1 2 Video Language General Dolby Digital Out Dolby Digital DTS Out - Dolby Digital 3 PCM Linear PCM Out - Down Sample On MPEG Out - MPEG 3 PCM Digital Out - On Move SETUP Exit DVDPLAYER ÛN¿zm,? Î DVD POWER - _ 1 2 Î OPEN/CLOSE DISPLAY AUDIO SUBTITLE ANGLE SETUP MENU MULTI DIAL TOP MENU ENTER FUNCTION VIDEO MEMORY ADJUST F.MEM V.ADJ DIMMER JOG MODE FL JOG STOP 7 PLAY 3 PAUSE 8 PREVIOUS NEXT 4¢ REV FWD 1¡ RETURN STEP/SLOW SEARCH MODE e E CLEAR 1 2 3 C 4 5 6 +10 78 RANDOM REPEAT 90 PROGRAM A-B LAST MEMORY CONDITION MEMORY DVD PLAYER 3,4,5,6 5 Move the cursor control joystick up or down to select the setting you want to change. The options available for each setting appear to the right when the setting is selected. The current setting appears with the setting indicator lit. 6 Move the cursor control joystick right to enter the setting options. Audio1 2 Video Language General Dolby Digital Out Dolby Digital DTS Out - Dolby Digital 3 PCM Linear PCM Out - Down Sample On MPEG Out - MPEG 3 PCM Digital Out - On Move SETUP Exit • Not all menu options can be changed while a disc is playing. In these cases, the options appear grayed out on the screen and cannot be adjusted. To change these settings, press STOP 7 first before pressing SETUP. • Operating the menu after pressing STOP 7 may cancel the resume function. • Some menu options are not immediately effective if set while a disc is playing. To make these settings effective, stop playback and then start again, or change the settings while the disc is stopped. GETTING STARTED USING YOUR DVD PLAYER/ ADJUSTING AUDIO AND VIDEO SETTINGS 27 En
-
 1
1 -
2
-
3
-
4
-
5
-
6
-
7
-
8
-
9
-
10
-
11
-
12
-
13
-
14
-
15
-
16
-
17
-
18
-
19
-
20
-
21
-
 22
22 -
 23
23 -
 24
24 -
 25
25 -
 26
26 -
 27
27 -
 28
28 -
 29
29 -
 30
30 -
 31
31 -
 32
32 -
33
-
34
-
35
-
36
-
37
-
38
-
39
-
40
-
41
-
42
-
43
-
44
-
45
-
46
-
47
-
48
-
49
-
50
-
51
-
52
-
53
-
54
-
55
-
56
-
57
-
58
-
59
-
60
-
61
-
62
-
63
-
64
-
65
-
66
-
67
-
68
-
69
-
70
-
71
-
72
-
73
-
74
-
75
-
76
 |
 |
