Pioneer HTP-710 Operating Instructions - Page 29
Small non-skid pads, Black
 |
View all Pioneer HTP-710 manuals
Add to My Manuals
Save this manual to your list of manuals |
Page 29 highlights
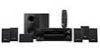
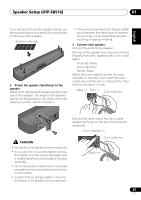
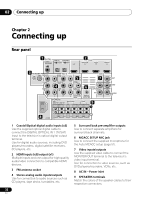
Speaker Setup (HTP-SB510) 01 English Français Deutsch Italiano Español Nederlands If you decide not to use the speaker stands, use the supplied adhesive to attach four small pads to the base of the speaker. Small non-skid pads 2 Attach the speaker stand bases to the speaker. Attach both right and left speaker stands to the rear of the speaker. The height of the speaker stands can be adjusted in two levels; select the height you prefer, and fix in position. • If the unit is assembled with foreign matter stuck between the stand and the speaker the unit may not be assembled securely, resulting in tipping or falling. 3 Connect each speaker. Connect the wires to the speaker. The rear of the speaker has channel terminals (Right/Center/Left), together with color-coded labels. Front left: White Front right: Red Center: Green Match the color-coded wire with the color indicator on the label, then insert the colorcoded wire into the red (+) side and the other wire into the black (-) side. Black (-) Red (+) Color-coded wire Connect the other end to the color-coded speaker terminals on the rear of the receiver subwoofer. Color-coded tab (+) CAUTION • Be careful not to tighten screws excessively. • If excessive force is used to tighten screws, the threads of screw may be damaged. Use a middle-sized manual screwdriver during assembly. • Do not use power screwdrivers or oversized screwdrivers that may exert excessive force on the screws. • Confirm that no foreign matter is stuck to the stand or the speaker during assembly. Color-coded wire Black (-) 29 En
-
 1
1 -
2
-
3
-
4
-
5
-
6
-
7
-
8
-
9
-
10
-
11
-
12
-
13
-
14
-
15
-
16
-
17
-
18
-
19
-
20
-
21
-
22
-
23
-
 24
24 -
 25
25 -
 26
26 -
 27
27 -
 28
28 -
 29
29 -
 30
30 -
 31
31 -
 32
32 -
 33
33 -
 34
34 -
35
-
36
-
37
-
38
-
39
-
40
-
41
-
42
-
43
-
44
-
45
-
46
-
47
-
48
-
49
-
50
-
51
-
52
-
53
-
54
-
55
-
56
-
57
-
58
-
59
-
60
-
61
-
62
-
63
-
64
-
65
-
66
-
67
-
68
-
69
-
70
-
71
-
72
-
73
-
74
-
75
-
76
-
77
-
78
-
79
-
80
-
81
-
82
-
83
-
84
-
85
-
86
-
87
-
88
-
89
-
90
-
91
-
92
-
93
-
94
-
95
-
96
-
97
-
98
-
99
-
100
-
101
-
102
-
103
-
104
-
105
-
106
-
107
-
108
-
109
-
110
-
111
-
112
-
113
-
114
-
115
-
116
-
117
-
118
-
119
-
120
-
121
-
122
-
123
-
124
-
125
-
126
-
127
-
128
-
129
-
130
-
131
-
132
-
133
-
134
-
135
-
136
-
137
-
138
-
139
-
140
-
141
-
142
-
143
-
144
-
145
-
146
-
147
-
148
-
149
-
150
-
151
-
152
-
153
-
154
-
155
-
156
-
157
-
158
-
159
-
160
-
161
-
162
-
163
-
164
-
165
-
166
-
167
-
168
-
169
-
170
-
171
-
172
-
173
-
174
-
175
-
176
-
177
-
178
-
179
-
180
-
181
-
182
-
183
-
184
-
185
-
186
-
187
-
188
-
189
-
190
-
191
-
192
-
193
-
194
-
195
-
196
-
197
-
198
-
199
-
200
-
201
-
202
-
203
-
204
-
205
-
206
-
207
-
208
-
209
-
210
-
211
-
212
-
213
-
214
-
215
-
216
-
217
-
218
-
219
-
220
-
221
-
222
-
223
-
224
-
225
-
226
-
227
-
228
-
229
-
230
-
231
-
232
-
233
-
234
-
235
-
236
-
237
-
238
-
239
-
240
-
241
-
242
-
243
-
244
-
245
-
246
-
247
-
248
-
249
-
250
-
251
-
252
-
253
-
254
-
255
-
256
-
257
-
258
-
259
-
260
-
261
-
262
-
263
-
264
-
265
-
266
-
267
-
268
-
269
-
270
-
271
-
272
 |
 |
