Pioneer PRO-800HD Other Manual - Page 32
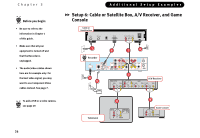
Setup 6: Cable or Satellite Box, A/V Receiver, and Game, Digital Audio Out
 |
View all Pioneer PRO-800HD manuals
Add to My Manuals
Save this manual to your list of manuals |
Page 32 highlights
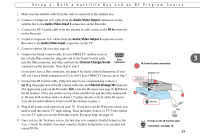
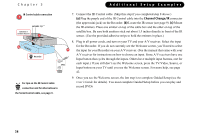
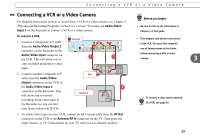
Setup 6: Cable or Satellite Box, A/V Receiver, and Game 1. Cable or Satellite Box to Recorder Make sure the cable from the wall is connected to your cable or satellite box. Connect a Composite Video and Left/Right Audio cable from the Audio/Video Out connectors on the cable or satellite box to the Audio/Video Input 1 connectors on the Recorder. (If you have cable, but don't have a cable or satellite box, connect the RF Coaxial cable currently coming from the wall to the connector labeled RF IN on the Recorder.) 2. Recorder to A/V Receiver Connect Composite A/V cables from the Audio/Video Output 1 connectors on the Recorder to the Audio/Video Input connectors on the A/V receiver. If the A/V Receiver has a Digital Audio Input, you can connect a digital audio cable (not supplied) from the Recorder's Digital Audio Out to the A/V receiver. 3 3. A/V Receiver to TV Connect Composite A/V cables from the Audio/Video Output connectors on the A/V receiver to the Audio/Video Input connectors on the TV. 4. Game Console to A/V Receiver Connect Composite A/V cables from the Audio/Video Output connectors on the Game Console to the Audio/Video Input connectors on the A/V receiver. 5. Connect a phone line (see page 8). 6. Connect the Serial Control cable. If your DIRECTV satellite receiver has a 9-pin Data connector, plug one end of the Serial Control cable into the Data connector, and other end into the Channel Change/Serial connector on the Recorder. Then skip to step 8. Data Connector If you don't have a Data connector, see page 9 for Serial control alternatives. If you still can't use a Serial connection or if you don't have DIRECTV service, go to step 7. 27
-
 1
1 -
2
-
3
-
4
-
5
-
6
-
7
-
8
-
9
-
10
-
11
-
12
-
13
-
14
-
15
-
16
-
17
-
18
-
19
-
20
-
21
-
22
-
23
-
24
-
25
-
26
-
 27
27 -
 28
28 -
 29
29 -
 30
30 -
 31
31 -
 32
32 -
 33
33 -
 34
34 -
 35
35 -
 36
36 -
 37
37 -
38
-
39
-
40
-
41
-
42
-
43
-
44
-
45
-
46
-
47
-
48
-
49
-
50
-
51
-
52
-
53
-
54
-
55
-
56
-
57
-
58
-
59
-
60
-
61
-
62
-
63
-
64
-
65
 |
 |
