Pioneer PRO-800HD Other Manual - Page 33
Channel Change/IR - manual
 |
View all Pioneer PRO-800HD manuals
Add to My Manuals
Save this manual to your list of manuals |
Page 33 highlights
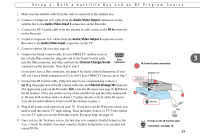
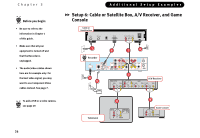
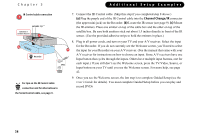
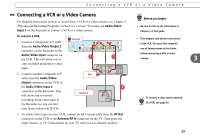
Chapter 3 IR Control cable connection 7 extends 1½ " Cable Box or Satellite Receiver c b Recorder ® For tips on the IR Control cable connection and for alternatives to ® the Serial Control cable, see page 9. Additional Setup Examples 7. Connect the IR Control cable. (Skip this step if you completed step 8 above.) (a) Plug the purple end of the IR Control cable into the Channel Change/IR connector (the upper mini-jack) on the Recorder. (b) Locate the IR sensor (see page 9). (c) Mount the IR emitters. Place one emitter on top of the cable box and the other on top of the satellite box. Be sure both emitters stick out about 1.5 inches directly in front of the IR sensor. (Use the provided adhesive strips to hold the emitters in place.) 8. Plug in all power cords, and turn on your TV and your A/V receiver. Select the input for the Recorder. If you do not currently see the Welcome screen, you'll need to select a the input for your Recorder on your A/V receiver. (See the manual that came with your A/V receiver for instructions on how to choose an input. Some A/V receivers have one Input button that cycles through the inputs. Others have multiple input buttons, one for each input.) If you still don't see the Welcome screen, press the TV/Video, Source, or Input button on your TV until you see the Welcome screen. For more help, see page 42. 9. Once you see the Welcome screen, the last step is to complete Guided Setup (see the User's Guide for details). You must complete Guided Setup before you can play and record DVDs 28
-
 1
1 -
2
-
3
-
4
-
5
-
6
-
7
-
8
-
9
-
10
-
11
-
12
-
13
-
14
-
15
-
16
-
17
-
18
-
19
-
20
-
21
-
22
-
23
-
24
-
25
-
26
-
27
-
 28
28 -
 29
29 -
 30
30 -
 31
31 -
 32
32 -
 33
33 -
 34
34 -
 35
35 -
 36
36 -
 37
37 -
 38
38 -
39
-
40
-
41
-
42
-
43
-
44
-
45
-
46
-
47
-
48
-
49
-
50
-
51
-
52
-
53
-
54
-
55
-
56
-
57
-
58
-
59
-
60
-
61
-
62
-
63
-
64
-
65
 |
 |
