Pioneer SC-LX501 Basic Manual English/French - Page 19
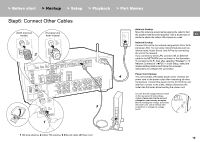
Step6: Connect Other Cables
 |
View all Pioneer SC-LX501 manuals
Add to My Manuals
Save this manual to your list of manuals |
Page 19 highlights
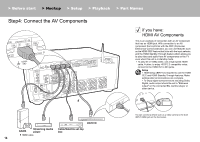
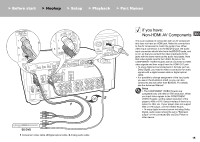
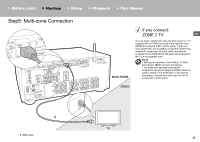
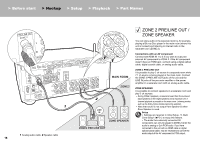
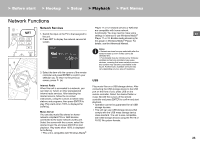
> Before start > Hookup > Setup > Playback > Part Names Step6: Connect Other Cables (North American models) (European and Asian models) 2 Antenna Hookup Move the antenna around while playing the radio to find the position with the best reception. Use a thumb tack or En similar to attach the indoor FM antenna to a wall. Network Hookup Connect this unit to the network using wired LAN or Wi-Fi (wireless LAN). You can enjoy network features such as internet radio, Music Server, and AirPlay by connecting the unit to the network. If you connect by wired LAN, connect with an Ethernet cable to the NETWORK port as shown in the illustration. To connect by Wi-Fi, then after selecting "Wireless" in "3. Network Connection" (P21) in Initial Setup, select the desired setting method and follow the onscreen instructions to configure the connection. Power Cord Hookup 4 This unit includes removable power cords. Connect the power cord to the power outlet after completing all other connections. Connect the power cord to AC IN of the unit and then connect to the outlet. Always disconnect the outlet side first when disconnecting the power cord. You can find the voltage selector switch on the rear panel of multi-voltage models. Please set it to the correct voltage for your country or region. Before changing the voltage, disconnect 3 the power cord. Use a medium size screwdriver to change the voltage switch. 1 1 AM loop antenna, 2 Indoor FM antenna, 3 Ethernet cable, 4 Power cord 19
-
 1
1 -
2
-
3
-
4
-
5
-
6
-
7
-
8
-
9
-
10
-
11
-
12
-
13
-
 14
14 -
 15
15 -
 16
16 -
 17
17 -
 18
18 -
 19
19 -
 20
20 -
 21
21 -
 22
22 -
 23
23 -
 24
24 -
25
-
26
-
27
-
28
-
29
-
30
-
31
-
32
-
33
-
34
-
35
-
36
-
37
-
38
-
39
-
40
-
41
-
42
-
43
-
44
-
45
-
46
-
47
-
48
-
49
-
50
-
51
-
52
-
53
-
54
-
55
-
56
-
57
-
58
-
59
-
60
-
61
-
62
-
63
-
64
-
65
-
66
-
67
-
68
 |
 |
