Pioneer VSX-21 Operating Instructions - Page 25
Remote Control
 |
UPC - 012562957067
View all Pioneer VSX-21 manuals
Add to My Manuals
Save this manual to your list of manuals |
Page 25 highlights
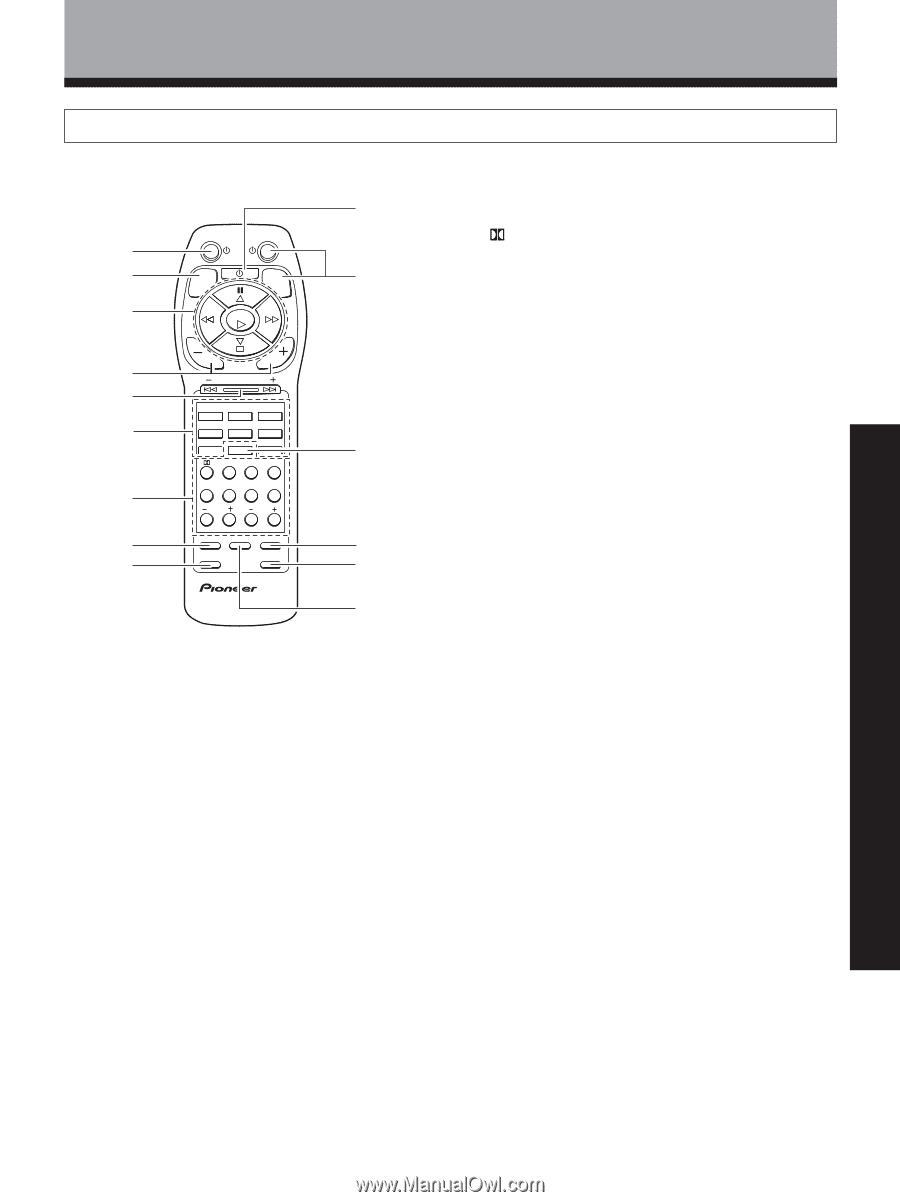
Names of Parts and Basic Operations SET UP OPERATION Remote Control These pages describe the buttons on the remote control used to operate the receiver. 0 1 2 3 4 5 6 7 8 9 RECEIVER TV MUTING FQ TV FUNC + ENTER - FQ VOL VOL CHANNEL MULTI CONTROL DVD/LD TV/SAT CD VCR 1 TVCONTROL TUNER VCR 2 RECEIVER MD/TAPE DSP MODE MIDNIGHT 12 34 CH.SELECT TEST TONE ATT SIG.SELECT 56 7 8 CN.LEVEL 90 EFFECT +10 MEMU CLASS TV/VCR FUNCTION DIRECT FL DIMMER MODE CHECK COMMANDER SET UP Î AUDIO/VIDEO PRE-PROGRAMMED REMOTE CONTROL UNIT - = ~ ! @ 1 RECEIVER button Press to switch the receiver on or to put in standby. 2 MUTING button Press to mute the volume. "MUTING" appears in the display. Press again to cancel. 3 ENTER buttons Specific use of these buttons is described in conjunction with the operations they are used in. ENTER : Press to switch the band (FM/AM) when using the tuner. 4 VOL (+/-) buttons Press to adjust the volume. When VOL (+/-) buttons are pressed while muting, muting is canceled. 5 CHANNEL (+/-) button Use to select preset stations when operating the tuner. When the remote is used to control other components, this button may be used to change channels, tracks, or chapters. 6 MULTI CONTROL buttons Use these buttons to select the remote operation mode. For example, pressing TUNER sets the remote to operate the tuner functions. 7 Number buttons These buttons can perform a variety of different functions depending on the remote operation mode. • [RECEIVER operations (press RECEIVER first)] : Press repeatedly to select the standard Dolby/ DTS mode and the ADVANCED THEATER modes. (Refer to page 30, 32) DSP MODE : Press repeatedly to select a DSP sound mode (refer to page 31). MIDNIGHT : Press to hear surround sound effectively at low volumes (refer to page 35). CH.SELECT : Use to select a speaker when adjusting speaker levels. TEST TONE : Press to switch the test tone on or off when listening to a surround mode (refer to page 21). ATT : Press to attenuate (lower) the level of the input signals and prevent distortion (refer to "Display", 5, Overload indicator on page 24). SIG.SELECT : When the same component uses both analog and digital connections, use to select input signals as digital or analog. CH.LEVEL (-/+) : Use to adjust individual speaker levels. EFFECT (+/-) : Use to adjust the DSP mode effect level. • [TUNER operations (press TUNER first)] Number buttons (0~9) : During preset tuning, use to input the number of the preset station. Use to input the station frequency during direct tuning. CLASS (+10) : Press repeatedly to switch the preset station classes during preset tuning. MENU : Press to activate direct tuning. 8 FUNCTION button Press repeatedly to select a source. 9 MODE CHECK button Press to confirm the current remote operation mode and to switch operation modes without changing the source (refer to page 51). 0 Power button Press to turn on or put in standby all connected components other than this unit. - TV/TV FUNC button Press TV to turn the TV's power on or put in standby. Press TV FUNC to select the TV for remote control operation. = RECEIVER button Press to select the receiver for remote control operation. ~ FL DIMMER button Press to adjust the brightness of the fluorescent display. Four levels of brightness ranging from very dim to very bright can be selected. ! COMMANDER SET UP button Use to customize the remote control functions. (Refer to "Setting Up the Remote Control" starting on page 22.) @ DIRECT button Use to playback original source audio. When DIRECT is ON, Dolby, DSP, LOUDNESS, DIGITAL NR and MIDNIGHT mode are automatically turned OFF. 25
-
 1
1 -
2
-
3
-
4
-
5
-
6
-
7
-
8
-
9
-
10
-
11
-
12
-
13
-
14
-
15
-
16
-
17
-
18
-
19
-
 20
20 -
 21
21 -
 22
22 -
 23
23 -
 24
24 -
 25
25 -
 26
26 -
 27
27 -
 28
28 -
 29
29 -
 30
30 -
31
-
32
-
33
-
34
-
35
-
36
-
37
-
38
-
39
-
40
-
41
-
42
-
43
-
44
-
45
-
46
-
47
-
48
-
49
-
50
-
51
-
52
-
53
-
54
-
55
-
56
-
57
-
58
-
59
-
60
 |
 |