Pioneer VSX-54TX Owner's Manual - Page 15
Connecting your equipment
 |
View all Pioneer VSX-54TX manuals
Add to My Manuals
Save this manual to your list of manuals |
Page 15 highlights
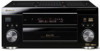
Connecting your equipment 03 Chapter 3 Connecting your equipment This receiver provides you with almost limitless possibilities for connecting your audio/video system, but it doesn't have to be difficult. Depending on your needs, you could be up and running in no time after a few simple connections. This section has been designed so that you can read through this short introduction, then jump to the specific connections that you need to make. For a basic home theater setup, you may only need to look through the TV, DVD and speaker connections. Rear panel 25 6 7 8 11 13 3 8 10 14 17 4 9 1 12 16 15 Caution • Before making or changing the connections, switch off the power and disconnect the power cord from the power outlet. Plugging in components should be the last connection you make with your system. 1 Digital audio coaxial inputs Two coaxial digital audio inputs for connecting digital audio sources to this receiver. All the inputs are freely assignable to input functions for maximum flexibility. • If a connected component does not correspond to the input function (DVD/LD, etc.), see Assigning the digital inputs on page 72 to assign it properly. 2 IR input/output An IR connection allows you to connect an external remote control sensor, when your component system is in a closed cabinet or shelving unit, for example. See Connecting an IR receiver on page 69 for connection details. 3 Control input/output Mini-plug terminals for connection to other Pioneer components to enable you to control all your equipment from a single remote sensor. See Operating other Pioneer components with this unit's sensor on page 60 for connection details. 4 Stereo analog audio source inputs/outputs Four sets of analog audio jacks for connection to audio sources such as CD players, tape decks and turntables. The CD-R/TAPE1 and MD/TAPE2 functions also feature outputs for recording. See Connecting analog audio sources on page 26 for connection details. 5 Antenna terminals Connections for AM and FM radio antennas. See Connecting antennas on page 30 for connection details. 6 Digital audio optical inputs Two optical digital audio inputs for connecting digital audio sources to this receiver. All the inputs are freely assignable to input functions for maximum flexibility. • If a connected component does not correspond to the input function (DVD/LD, etc.), see Assigning the digital inputs on page 72 to assign it properly. 15 En
-
 1
1 -
2
-
3
-
4
-
5
-
6
-
7
-
8
-
9
-
 10
10 -
 11
11 -
 12
12 -
 13
13 -
 14
14 -
 15
15 -
 16
16 -
 17
17 -
 18
18 -
 19
19 -
 20
20 -
21
-
22
-
23
-
24
-
25
-
26
-
27
-
28
-
29
-
30
-
31
-
32
-
33
-
34
-
35
-
36
-
37
-
38
-
39
-
40
-
41
-
42
-
43
-
44
-
45
-
46
-
47
-
48
-
49
-
50
-
51
-
52
-
53
-
54
-
55
-
56
-
57
-
58
-
59
-
60
-
61
-
62
-
63
-
64
-
65
-
66
-
67
-
68
-
69
-
70
-
71
-
72
-
73
-
74
-
75
-
76
-
77
-
78
-
79
-
80
-
81
-
82
-
83
-
84
-
85
-
86
-
87
-
88
-
89
-
90
-
91
-
92
-
93
-
94
-
95
 |
 |
