RCA CDRW121 User Guide - Page 11
Recording - details
 |
UPC - 044319902457
View all RCA CDRW121 manuals
Add to My Manuals
Save this manual to your list of manuals |
Page 11 highlights
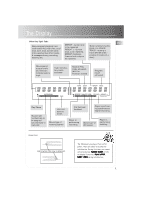
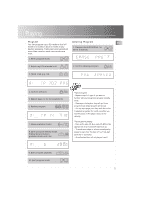
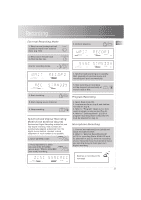
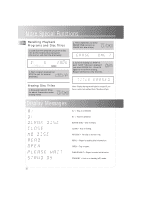
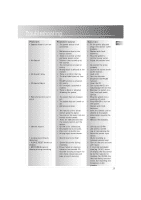
Recording EN Step 1 Loading Discs 1. Insert a blank audio CD-R or CD-RW on TRAY B (the recorder). The recorder will search automatically the end of the last track and stop to continue recording if recordings already exist. Note: REWRITABLE (for CD-RW) or RECORDABLE (for CD-R) icon must light on display. Otherwise, your disc may not be an audio one and no recording can be made. (see "More Information" for details on discs for recording) 2. Load source CD on TRAY A. Otherwise connect and select external source for recording. Step 2 Selecting Recording Mode Dubbing Mode 6. Stop dubbing or dubbing STOP will stop automatically at end of track or disc. Live Dubbing Mode Live effects can be inserted automatically at the last 7 seconds of selected tracks or each track on a disc during dubbing. 1. Press and hold LIVE for about 3 seconds to enter live dubbing mode. 6 SHIFT LIVE 2. Press repeatedly to select between DISC LIVE (whole disc)/ TRACK LIVE (one track) dubbing (see tip). 6 SHIFT LIVE 1. Enter dubbing mode 2. Press repeatedly to select dubbing speed (HIGH SPEED/ NORMAL SPEED) 3. Confirm selection. Recording OK starts automatically after about 10-15 seconds. 3. Confirm selection. OK 4. Press repeatedly to select between DISC DIGITAL (whole disc) or TRACK DIGITAL (one track) dubbing (see tip). 4. Press repeatedly to select live effect you want to insert. 5. Stop dubbing or dubbing will stop automatically at end of track or disc.. SHIFT 5 LIVE SELECT STOP Tips on dubbing/ live dubbing: • Dubbing mode is for recording from Tray A 5. Confirm selection. Dubbing to Tray B. starts automatically after OK • For track dubbing, select desired track in about 10-15 seconds. stop mode before entering dubbing mode. 10
-
 1
1 -
2
-
3
-
4
-
5
-
 6
6 -
 7
7 -
 8
8 -
 9
9 -
 10
10 -
 11
11 -
 12
12 -
 13
13 -
 14
14 -
 15
15 -
 16
16 -
17
-
18
-
19
 |
 |
