RCA CDRW121 User Guide - Page 12
External Recording Mode, Synchronized Digital Recording, Mode from External Source, Program - 2 disc cd recorder manual
 |
UPC - 044319902457
View all RCA CDRW121 manuals
Add to My Manuals
Save this manual to your list of manuals |
Page 12 highlights
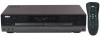
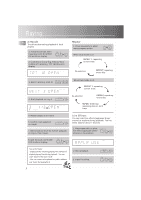
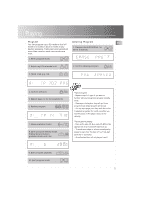
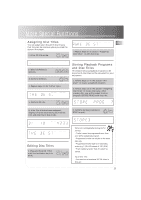
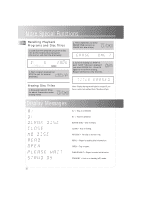
Recording External Recording Mode 1. Select source (analog/ optical/ coaxial) to match with external input (e.g. MD) 2. Select auto/ manual track numbering (see tip). 3. Enter recording mode. 3. Confirm selection. RECORD OK EN 4. Synchronized recording is on standby. Start playback of external source and recording will start automatically. 5. Stop recording or recording STOP will be stopped automatically at end of track or disc. 4. Start recording. OK 5. Start playing source material. STOP 6. Stop recording. Synchronized Digital Recording Mode (from External Source) Synchronized Digital Recording enables fast and easy digital recording. Track numbers are automatically assigned as detected from the digital source material. However, manual assignment of track numbers is not possible. 1. Enter CD-SYNC mode. CD-SYNC 2. Press repeatedly to select between DISC SYNCREC CD-SYNC (whole disc) / TRACK SYNCREC (one track) recording. Program Recording 1. Select Dual mode ON. 2. Load source disc on tray A and destination disc on tray B. 3. Refer to "Program" (steps 1-7, p. 9) to create program on source disc (Tray A). 4. Refer to "Dubbing Mode" (p.10) for program recording (Note: DISC DIGITAL must be selected for step 4). Microphone Recording 1. Connect microphone(s) into jack(s) and adjust microphone level. 2. Refer to "External Recording Mode" (p.11) for recording (Note: ANALOG must be selected for step 1). With the recording of your favourite music from external input, you can sing along to make your own digital recording. Read tips on recording on the next page! 11
-
 1
1 -
2
-
3
-
4
-
5
-
6
-
 7
7 -
 8
8 -
 9
9 -
 10
10 -
 11
11 -
 12
12 -
 13
13 -
 14
14 -
 15
15 -
 16
16 -
 17
17 -
18
-
19
 |
 |