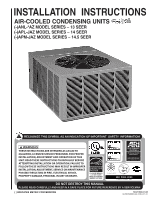
Rheem RAMP-JEZ Installation Instructions - Page 2

Table Of Contents - lowe

Page 2 highlights

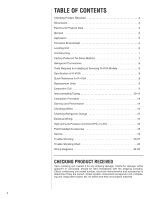
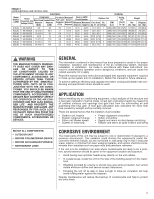
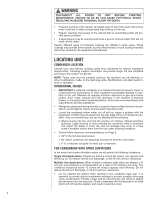
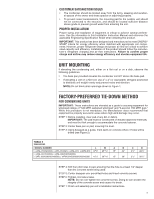
TABLE OF CONTENTS Checking Product Received 2 Dimensions 3 Electrical & Physical Data 4 General 5 Application 5 Corrosive Environment 5 Locating Unit 6 Unit Mounting 7 Factory-Preferred Tie-Down Method 7 Refrigerant Connections 8 Tools Required for Installing & Servicing R-410A Models 8 Specification of R-410A 8 Quick Reference for R-410A 9 Replacement Units 9 Evaporator Coil 9 Interconnecting Tubing 10-13 Evacuation Procedure 14 Start-Up and Performance 14 Checking Airflow 14 Checking Refrigerant Charge 15 Electrical Wiring 16 High and Low Pressure Controls (HPC or LPC 18 Field Installed Accessories 18 Service 19 Trouble Shooting 20-22 Trouble Shooting Chart 23 Wiring Diagrams 24-26 CHECKING PRODUCT RECEIVED Upon receiving unit, inspect it for any shipping damage. Claims for damage, either apparent or concealed, should be filed immediately with the shipping company. Check condensing unit model number, electrical characteristics and accessories to determine if they are correct. Check system components (evaporator coil, condensing unit, evaporator blower, etc.) to make sure they are properly matched. 2

  • 1
  • 2
  • 3
  • 4
  • 5
  • 6
  • 7
  • 8
  • 9
  • 10
  • 11
  • 12
  • 13
  • 14
  • 15
  • 16
  • 17
  • 18
  • 19
  • 20
  • 21
  • 22
  • 23
  • 24
  • 25
  • 26
  • 27
  • 28

2
TABLE OF CONTENTS
Checking Product Received
.....................................
2
Dimensions
..................................................
3
Electrical & Physical Data
.......................................
4
General
.....................................................
5
Application
...................................................
5
Corrosive Environment
.........................................
5
Locating Unit
.................................................
6
Unit Mounting
.................................................
7
Factory-Preferred Tie-Down Method
...............................
7
Refrigerant Connections
........................................
8
Tools Required for Installing & Servicing R-410A Models
...............
8
Specification of R-410A
.........................................
8
Quick Reference for R-410A
.....................................
9
Replacement Units
............................................
9
Evaporator Coil
...............................................
9
Interconnecting Tubing
......................................
10-13
Evacuation Procedure
.........................................
14
Start-Up and Performance
......................................
14
Checking Airflow
.............................................
14
Checking Refrigerant Charge
...................................
15
Electrical Wiring
..............................................
16
High and Low Pressure Controls (HPC or LPC)
.....................
18
Field Installed Accessories
.....................................
18
Service
.....................................................
19
Trouble Shooting
..........................................
20-22
Trouble Shooting Chart
........................................
23
Wiring Diagrams
...........................................
24-26
CHECKING PRODUCT RECEIVED
Upon receiving unit, inspect it for any shipping damage. Claims for damage, either
apparent or concealed, should be filed immediately with the shipping company.
Check condensing unit model number, electrical characteristics and accessories to
determine if they are correct. Check system components (evaporator coil, condens-
ing unit, evaporator blower, etc.) to make sure they are properly matched.