Ricoh C221N Operating Instructions - Page 63
Continue, Cancel, User Guide, Search Network Printer, User Tools, Job Log, Status, Printer graphic
 |
UPC - 026649060083
View all Ricoh C221N manuals
Add to My Manuals
Save this manual to your list of manuals |
Page 63 highlights
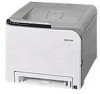
Using Smart Organizing Monitor ASH107S 1. Printer graphic 5. [User Guide] button If an input tray error occurs, appears. Click to display error related Help. 5 This identifies the tray where the error occurred. The problem tray is outlined in red. 6. [Search Network Printer] button Click to select a network printer. 2. Comments Displays current printer status and instructions for resolving problems. 3. [Continue] button Click to display the [Form Feed] dialog box which you can use to change input tray settings. 7. [User Tools] tab Prints the test page or configuration page. The [Printer Configuration] dialog box can be opened from this tab. 8. [Job Log] tab Displays the information related to print jobs. 4. [Cancel] button 9. [Status] tab Click to cancel a print job. Display the status of the items such as toner levels and paper level. Note ❒ [Continue] and [Cancel] button are always disabled for this printer model. 55
-
 1
1 -
2
-
3
-
4
-
5
-
6
-
7
-
8
-
9
-
10
-
11
-
12
-
13
-
14
-
15
-
16
-
17
-
18
-
19
-
20
-
21
-
22
-
23
-
24
-
25
-
26
-
27
-
28
-
29
-
30
-
31
-
32
-
33
-
34
-
35
-
36
-
37
-
38
-
39
-
40
-
41
-
42
-
43
-
44
-
45
-
46
-
47
-
48
-
49
-
50
-
51
-
52
-
53
-
54
-
55
-
56
-
57
-
 58
58 -
 59
59 -
 60
60 -
 61
61 -
 62
62 -
 63
63 -
 64
64 -
 65
65 -
 66
66 -
 67
67 -
 68
68 -
69
-
70
-
71
-
72
-
73
-
74
-
75
-
76
-
77
-
78
-
79
-
80
-
81
-
82
-
83
-
84
-
85
-
86
-
87
-
88
-
89
-
90
-
91
-
92
-
93
-
94
-
95
-
96
-
97
-
98
-
99
-
100
-
101
-
102
-
103
-
104
-
105
-
106
-
107
-
108
-
109
-
110
 |
 |
