Ricoh SP 112SU User Guide - Page 12
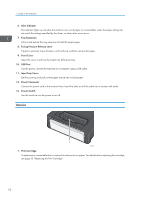
Interior, Alert Indicator, Tray Extension, Fusing Pressure Release Lever, Front Cover, USB Port
 |
View all Ricoh SP 112SU manuals
Add to My Manuals
Save this manual to your list of manuals |
Page 12 highlights
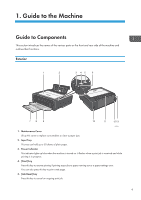
1. Guide to the Machine 6. Alert Indicator This indicator lights up red when the machine runs out of paper or consumables, when the paper settings do not match the settings specified by the driver, or when other errors occur. 7. Tray Extension Pull out and extend this tray extension to hold the output paper. 8. Fusing Pressure Release Lever If paper is jammed, lower the lever on the left end, and then remove the paper. 9. Front Cover Open this cover to pull out the output tray before printing. 10. USB Port Use this port to connect the machine to a computer using a USB cable. 11. Input Tray Cover Set this cover up and pull out the paper source tray to load paper. 12. Power Connector Connect the power cord to the machine here. Insert the other end of the cable into a nearby wall outlet. 13. Power Switch Use this switch to turn the power on or off. Interior 1 CXP043 1. Print Cartridge A replacement consumable that is required to make prints on paper. For details about replacing the cartridge, see page 33 "Replacing the Print Cartridge". 10
-
 1
1 -
2
-
3
-
4
-
5
-
6
-
 7
7 -
 8
8 -
 9
9 -
 10
10 -
 11
11 -
 12
12 -
 13
13 -
 14
14 -
 15
15 -
 16
16 -
 17
17 -
18
-
19
-
20
-
21
-
22
-
23
-
24
-
25
-
26
-
27
-
28
-
29
-
30
-
31
-
32
-
33
-
34
-
35
-
36
-
37
-
38
-
39
-
40
-
41
-
42
-
43
-
44
-
45
-
46
-
47
-
48
-
49
-
50
-
51
-
52
-
53
-
54
-
55
-
56
-
57
-
58
-
59
-
60
-
61
-
62
-
63
-
64
 |
 |