Ridgid LM-100 Owners Manual - Page 11
Measurements - light meter
 |
View all Ridgid LM-100 manuals
Add to My Manuals
Save this manual to your list of manuals |
Page 11 highlights
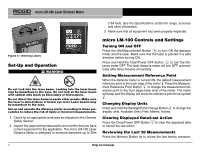
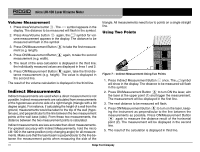
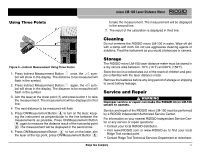
micro LM-100 Laser Distance Meter ments or calculated results, shown in reverse order. Use the Addi- tion or Subtraction Buttons to move through these records. Clearing Data From Memory Press and Hold the Memory Button and Press and Hold the Clear/Power Button Key at the same time to clear all data in the memory. Backlighting the Display Press the Backlight/Unit Change Button light ON or OFF. to turn the display back- Measurements The RIDGID micro LM-100 Laser Distance Meter has a measuring range of 50m (164') maximum. Use in bright sunlight may decrease the range of the meter. The reflective properties of the surface may also decrease the range of the meter. Measurement errors can occur when measuring to clear, semi-permeable or high gloss/reflective surfaces such as colorless liquids (e.g. water), glass, Styrofoam, mirrors, etc. Applying a commercially available laser target plate to the surface may allow more accurate measurements. NOTICE Do not aim the laser at the sun. This can damage the meter. Single Distance Measurement 1. Press ON/Measurement Button to activate the laser. Press ON/Measurement Button again to take a measurement. 2. The measured value is displayed immediately. Continuous Measurement, Max and Min Measurement 1. Press and Hold Continuous Measurement Button to enter the continuous measurement mode. In continuous measurement mode, the measured value is updated approximately every 0.5 seconds in the third line. The corresponding minimum and maximum values are displayed dynamically in the first and second line. 2. Press and Hold either ON/Measurement Button or Clear/Power OFF Button to stop taking continuous measurements. The device automatically stops after 100 continuous measurements. Adding/Subtracting Measurements 1. Press Addition Button to add the next measurement to the previous one. 2. Press Subtraction Button to subtract the next measurement the previous one. 3. Press Clear/Power OFF Button to cancel the last action. 4. Press Clear/Power OFF Button single measurements. again to return to taking Area Measurement 1. Press Area/Volume Button . The symbol appears in the display. The distance to be measured will flash in the symbol. 2. Press ON/Measurement Button to take the first measurement (e.g. length). 3. Press ON/Measurement Button measurement (e.g. width). again to take the second 4. The result of the area calculation is displayed in the third line; the individually measured values are displayed in lines 1 and 2. Ridge Tool Company 9
-
 1
1 -
2
-
3
-
4
-
5
-
 6
6 -
 7
7 -
 8
8 -
 9
9 -
 10
10 -
 11
11 -
 12
12 -
 13
13 -
 14
14 -
 15
15 -
 16
16 -
17
-
18
-
19
-
20
-
21
-
22
-
23
-
24
-
25
-
26
-
27
-
28
-
29
-
30
-
31
-
32
-
33
-
34
-
35
-
36
-
37
-
38
-
39
-
40
-
41
-
42
-
43
-
44
-
45
-
46
-
47
-
48
-
49
-
50
-
51
-
52
-
53
-
54
-
55
-
56
-
57
-
58
-
59
-
60
-
61
-
62
-
63
-
64
-
65
-
66
-
67
-
68
-
69
-
70
-
71
-
72
-
73
-
74
-
75
 |
 |
