Ridgid LM-100 Owners Manual - Page 13
Cleaning, Storage, Service and Repair
 |
View all Ridgid LM-100 manuals
Add to My Manuals
Save this manual to your list of manuals |
Page 13 highlights
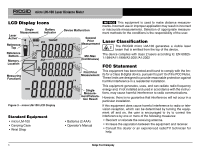
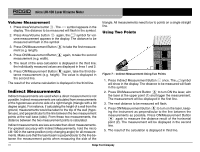
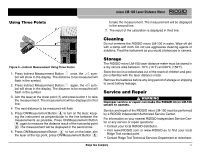
micro LM-100 Laser Distance Meter Using Three Points to take the measurement. The measurement will be displayed in the second line. 7. The result of the calculation is displayed in third line. Cleaning Do not immerse the RIDGID micro LM-100 in water. Wipe off dirt with a damp soft cloth. Do not use aggressive cleaning agents or solutions. Treat the instrument as you would a telescope or camera. Figure 8 - Indirect Measurement Using Three Points 1. Press Indirect Measurement Button once, the symbol will show in the display. The distance to be measured will flash in the symbol. 2. Press Indirect Measurement Button again, the symbol will show in the display. The distance to be measured will flash in the symbol. 3. Aim the laser at the lower point (1) and press button 1 to take the measurement. The measurement will be displayed in first line. 4. The next distance to be measured will flash. 5. Press ON/Measurement Button to turn on the laser, keeping the instrument as perpendicular to the line between the measurements as possible, Press ON/Measurement Button again to measure the distance result of the horizontal point (2). The measurement will be displayed in the second line. 6. Press ON/Measurement Button to turn on the laser, aim the laser at the top point, press ON/Measurement Button Storage The RIDGID micro LM-100 laser distance meter must be stored in a dry secure area between -10°C (14°F) and 60°C (158°F). Store the tool in a locked area out of the reach of children and people unfamiliar with the laser distance meter. Remove the batteries before any long period of storage or shipping to avoid battery leakage. Service and Repair WARNING Improper service or repair can make the RIDGID micro LM-100 unsafe to operate. Service and repair of the RIDGID micro LM-100 must be performed by a RIDGID Independent Authorized Service Center. For information on your nearest RIDGID Independent Service Center or any service or repair questions: • Contact your local RIDGID distributor. • Visit www.RIDGID.com or www.RIDGID.eu to find your local Ridge Tool contact point. • Contact Ridge Tool Technical Services Department at rtctechser- Ridge Tool Company 11
-
 1
1 -
2
-
3
-
4
-
5
-
6
-
7
-
 8
8 -
 9
9 -
 10
10 -
 11
11 -
 12
12 -
 13
13 -
 14
14 -
 15
15 -
 16
16 -
 17
17 -
 18
18 -
19
-
20
-
21
-
22
-
23
-
24
-
25
-
26
-
27
-
28
-
29
-
30
-
31
-
32
-
33
-
34
-
35
-
36
-
37
-
38
-
39
-
40
-
41
-
42
-
43
-
44
-
45
-
46
-
47
-
48
-
49
-
50
-
51
-
52
-
53
-
54
-
55
-
56
-
57
-
58
-
59
-
60
-
61
-
62
-
63
-
64
-
65
-
66
-
67
-
68
-
69
-
70
-
71
-
72
-
73
-
74
-
75
 |
 |
