Roxio Creator 2011 Product Manual - Page 70
Overview of importing media files, Importing photos or video files from a digital camera
 |
View all Roxio Creator 2011 manuals
Add to My Manuals
Save this manual to your list of manuals |
Page 70 highlights
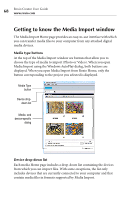
70 Roxio Creator User Guide www.roxio.com Overview of importing media files This section gives an overview of the import process, using photos or video files on a digital camera as an example. The procedures for importing different types of media files from other sources are similar, but may not be exactly the same as the procedure given in this chapter. For more information about importing media files from these other devices, see the Media Import Help Center. Importing photos or video files from a digital camera Use this procedure to import photos. If your digital camera supports a movie or video feature, you can also use this procedure to import video files. To import photos from a camera: 1 Connect the camera to your computer following the instructions that came with the camera. 2 Use the Windows AutoPlay dialog or Roxio Home to open Media Import. From Roxio Home, click the Photo project category, then click Import Photos. 3 Using Media Import's Device drop-down list, select your camera. 4 Select the photos or videos to import. 5 Select the location in which you want to save the media files. 6 In the Rename Files text box, enter a name for the selected files. Media Import uses the text entered in this box as the beginning of the file name for each imported media file. For example, if you are importing multiple photos and enter "PhotoDec15," the imported files are named "PhotoDec15 00000," "PhotoDec15 00001," and so on. 7 Optional: Select the Delete files from device after transfer check box to delete the photos from the camera after the import process is complete. 8 Click Import Now. Media Import imports the digital media files to the selected folder.
-
 1
1 -
2
-
3
-
4
-
5
-
6
-
7
-
8
-
9
-
10
-
11
-
12
-
13
-
14
-
15
-
16
-
17
-
18
-
19
-
20
-
21
-
22
-
23
-
24
-
25
-
26
-
27
-
28
-
29
-
30
-
31
-
32
-
33
-
34
-
35
-
36
-
37
-
38
-
39
-
40
-
41
-
42
-
43
-
44
-
45
-
46
-
47
-
48
-
49
-
50
-
51
-
52
-
53
-
54
-
55
-
56
-
57
-
58
-
59
-
60
-
61
-
62
-
63
-
64
-
 65
65 -
 66
66 -
 67
67 -
 68
68 -
 69
69 -
 70
70 -
 71
71 -
 72
72 -
 73
73 -
 74
74 -
 75
75 -
76
-
77
-
78
-
79
-
80
-
81
-
82
-
83
-
84
-
85
-
86
-
87
-
88
-
89
-
90
-
91
-
92
-
93
-
94
-
95
-
96
-
97
-
98
-
99
-
100
-
101
-
102
-
103
-
104
-
105
-
106
-
107
-
108
-
109
-
110
-
111
-
112
-
113
-
114
-
115
-
116
-
117
-
118
-
119
-
120
-
121
-
122
-
123
-
124
-
125
-
126
-
127
-
128
-
129
-
130
-
131
-
132
-
133
-
134
-
135
-
136
-
137
-
138
-
139
-
140
-
141
-
142
-
143
-
144
-
145
-
146
-
147
-
148
-
149
-
150
-
151
-
152
-
153
-
154
-
155
-
156
-
157
-
158
-
159
-
160
-
161
-
162
-
163
-
164
-
165
-
166
-
167
-
168
-
169
-
170
-
171
-
172
-
173
-
174
-
175
-
176
-
177
-
178
-
179
-
180
-
181
-
182
-
183
-
184
-
185
-
186
-
187
-
188
-
189
-
190
-
191
-
192
-
193
-
194
-
195
-
196
-
197
-
198
-
199
-
200
-
201
-
202
-
203
-
204
-
205
-
206
-
207
-
208
-
209
-
210
-
211
-
212
-
213
-
214
-
215
-
216
-
217
-
218
-
219
-
220
-
221
-
222
-
223
-
224
-
225
-
226
-
227
-
228
-
229
-
230
-
231
-
232
-
233
-
234
-
235
-
236
-
237
-
238
-
239
 |
 |
