Samsung BD-C7900 User Manual (user Manual) (ver.1.0) (English) - Page 39
Clock, DivX(R) Registration, Network Setup, Network Settings
 |
UPC - 036725608375
View all Samsung BD-C7900 manuals
Add to My Manuals
Save this manual to your list of manuals |
Page 39 highlights
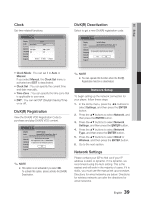
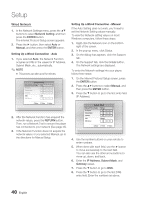
05 Setup Clock Set time-related functions. Settings Display Clock Audio Clock Mode System Clock Set Network Time Zone Language DST Security : Auto \ : GMT + 0:00 : Off General Support > Move " Enter ' Return DivX(R) Deactivation Select to get a new DivX(R) registration code. Settings Display Audio System Network Language Security General Support Initial Settings Internet@TV Screen Size : Size 2 Do you want to deactivate your device? Yes No • Clock Mode : You can set it to Auto or Manual. If you select Manual, the Clock Set menu is activated and DST is deactivated. • Clock Set : You can specify the current time and date manually. • Time Zone : You can specify the time zone that is applicable to your area. • DST : You can set DST (Daylight Saving Time) on or off. DivX(R) Registration View the DivX(R) VOD Registration Code to purchase and play DivX(R) VOD content. Settings Display Audio System Network Language Security General Support Initial Settings Internet@TV Screen Size : Size 2 DivX(R) Video On Demand Your registration code is : XXXXXXXXXX To learn more visit www.divx.com/vod OK ✎ NOTE ▪ This option is not activated if you select OK. To activate this option, please activate the DivX(R) Deactivation. ✎ NOTE ▪ You can operate this function when the DivX(R) Registration function is deactivated. Network Setup To begin setting up the network connection for your player, follow these steps: 1. In the Home menu, press the ◄► buttons to select Settings, and then press the ENTER button. 2. Press the ▲▼ buttons to select Network, and then press the ENTER button. 3. Press the ▲▼ buttons to select Network Settings, and then press the ENTER button. 4. Press the ▲▼ buttons to select Network Type, and then press the ENTER button. 5. Press the ▲▼ buttons to select Wired or Wireless, and then press the ENTER button. 6. Go to the next section. Network Settings Please contact your ISP to find out if your IP address is static or dynamic. If it is dynamic, we recommend using the Auto setting. This is the easiest and will work in the majority of cases. If it is static, you must use the manual set up procedure. Directions for wired networks are below. Directions for wireless networks are after the directions for wired networks. English 39
-
 1
1 -
2
-
3
-
4
-
5
-
6
-
7
-
8
-
9
-
10
-
11
-
12
-
13
-
14
-
15
-
16
-
17
-
18
-
19
-
20
-
21
-
22
-
23
-
24
-
25
-
26
-
27
-
28
-
29
-
30
-
31
-
32
-
33
-
 34
34 -
 35
35 -
 36
36 -
 37
37 -
 38
38 -
 39
39 -
 40
40 -
 41
41 -
 42
42 -
 43
43 -
 44
44 -
45
-
46
-
47
-
48
-
49
-
50
-
51
-
52
-
53
-
54
-
55
-
56
-
57
-
58
-
59
-
60
-
61
-
62
-
63
-
64
-
65
-
66
-
67
-
68
-
69
-
70
-
71
-
72
-
73
-
74
 |
 |
