Samsung CLP-415N User Manual Ver.1.0 (English) - Page 19
Control panel overview
 |
View all Samsung CLP-415N manuals
Add to My Manuals
Save this manual to your list of manuals |
Page 19 highlights
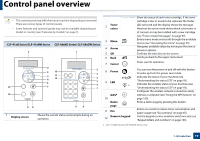
Control panel overview • This control panel may differ from your machine depending on its model. There are various types of control panels. • Some features and optional goods may not be available depending on model or country (see "Features by models" on page 7). Toner 2 colors CLP-41xN Series/CLP-41xNW Series CLP-68xND Series/ CLP-68xDW Series 1 1 2 2 3 12 3 4 11 5 10 4 5 6 6 11 7 7 10 98 9 8 1 Display screen Shows the current status and prompts during an operation. 3 Menu 4 Arrow 5 OK 6 Back 7 Cancel 8 Power 9 LED a WPSa 10 Demo page 11 Eco Numeric keypad 12 Show the status of each toner cartridge. If the toner cartridge is low or needs to be replaced, the Status LED turns red and the display shows the message. However the arrow mark shows which color toner is of concern or may be installed with a new cartridge (see "Toner-related messages" on page 97). Enters menu mode and scrolls through the available menus (see "Accessing the menu" on page 25). Navigates available values by moving to the next or previous options. Confirms the selection on the screen. Sends you back to the upper menu level. Stops current operation. You can turn the power on and off with this button. Or wake up from the power save mode. Indicates the status of your machine (see "Understanding the status LED" on page 93). Indicates the wireless status of your machine (see "Understanding the status LED" on page 93). Configures the wireless network connection easily without a computer (see "Using the WPS button" on page 150). Prints a demo page by pressing this button. Enters eco mode to reduce toner consumption and paper usage (see "Eco printing" on page 45). Use the keypad to enter numbers and characters (see "Keypad letters and numbers" on page 196). a. CLP-41xNW Series/CLP-68xDW Series only. 1. Introduction 19
-
 1
1 -
2
-
3
-
4
-
5
-
6
-
7
-
8
-
9
-
10
-
11
-
12
-
13
-
 14
14 -
 15
15 -
 16
16 -
 17
17 -
 18
18 -
 19
19 -
 20
20 -
 21
21 -
 22
22 -
 23
23 -
 24
24 -
25
-
26
-
27
-
28
-
29
-
30
-
31
-
32
-
33
-
34
-
35
-
36
-
37
-
38
-
39
-
40
-
41
-
42
-
43
-
44
-
45
-
46
-
47
-
48
-
49
-
50
-
51
-
52
-
53
-
54
-
55
-
56
-
57
-
58
-
59
-
60
-
61
-
62
-
63
-
64
-
65
-
66
-
67
-
68
-
69
-
70
-
71
-
72
-
73
-
74
-
75
-
76
-
77
-
78
-
79
-
80
-
81
-
82
-
83
-
84
-
85
-
86
-
87
-
88
-
89
-
90
-
91
-
92
-
93
-
94
-
95
-
96
-
97
-
98
-
99
-
100
-
101
-
102
-
103
-
104
-
105
-
106
-
107
-
108
-
109
-
110
-
111
-
112
-
113
-
114
-
115
-
116
-
117
-
118
-
119
-
120
-
121
-
122
-
123
-
124
-
125
-
126
-
127
-
128
-
129
-
130
-
131
-
132
-
133
-
134
-
135
-
136
-
137
-
138
-
139
-
140
-
141
-
142
-
143
-
144
-
145
-
146
-
147
-
148
-
149
-
150
-
151
-
152
-
153
-
154
-
155
-
156
-
157
-
158
-
159
-
160
-
161
-
162
-
163
-
164
-
165
-
166
-
167
-
168
-
169
-
170
-
171
-
172
-
173
-
174
-
175
-
176
-
177
-
178
-
179
-
180
-
181
-
182
-
183
-
184
-
185
-
186
-
187
-
188
-
189
-
190
-
191
-
192
-
193
-
194
-
195
-
196
-
197
-
198
-
199
-
200
-
201
-
202
-
203
-
204
-
205
-
206
-
207
-
208
-
209
-
210
-
211
-
212
-
213
-
214
-
215
-
216
-
217
-
218
-
219
-
220
-
221
-
222
-
223
-
224
-
225
-
226
-
227
-
228
-
229
-
230
-
231
-
232
-
233
-
234
-
235
-
236
-
237
-
238
-
239
-
240
-
241
-
242
-
243
-
244
-
245
-
246
-
247
-
248
-
249
-
250
-
251
-
252
-
253
-
254
-
255
-
256
-
257
-
258
-
259
-
260
-
261
-
262
-
263
-
264
-
265
-
266
-
267
-
268
-
269
-
270
 |
 |
