Samsung DVD-HD960 User Manual (ENGLISH) - Page 10
Rear Panel, If Progressive Out On Video Output is selected in Setup Menu - dvd
 |
UPC - 036725609600
View all Samsung DVD-HD960 manuals
Add to My Manuals
Save this manual to your list of manuals |
Page 10 highlights
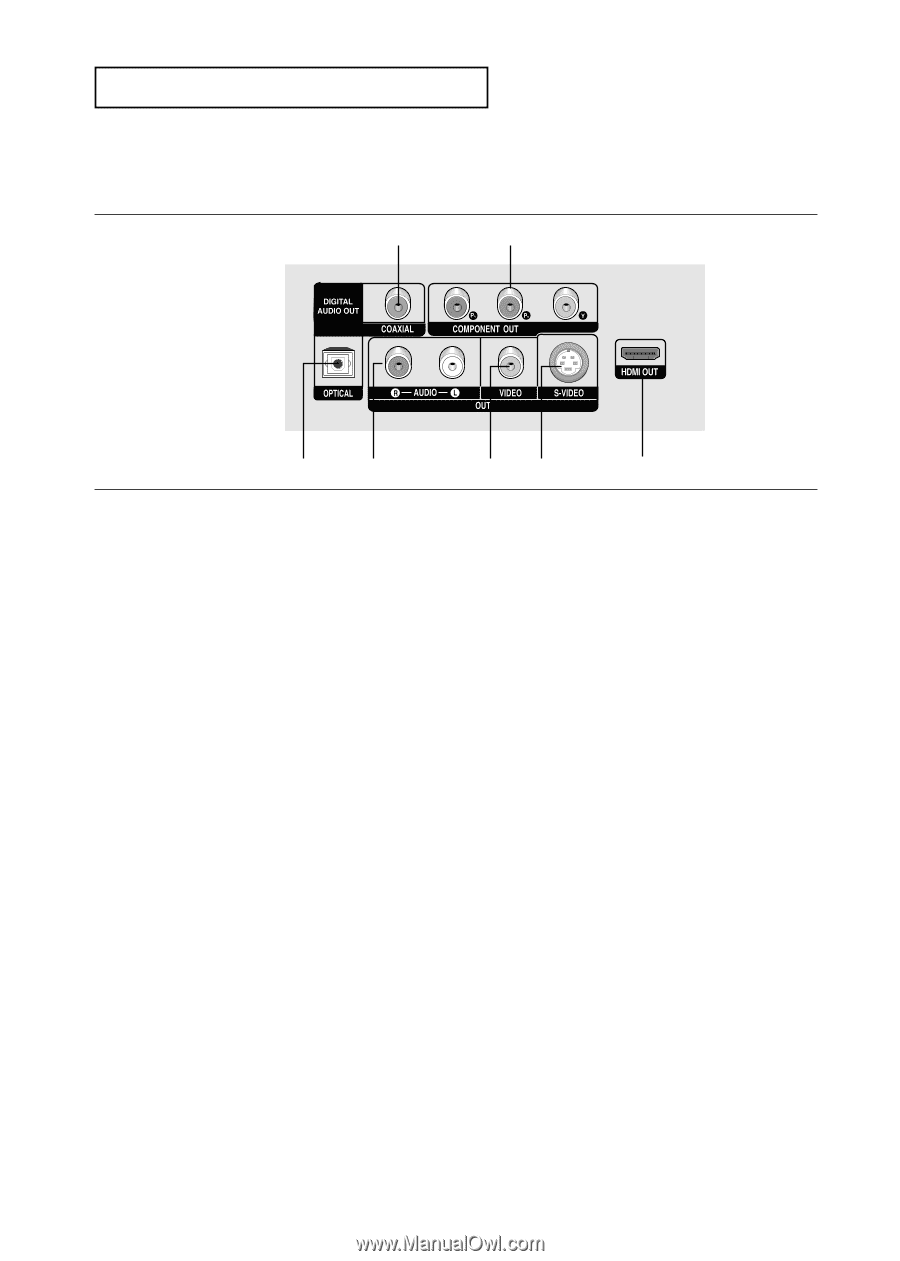
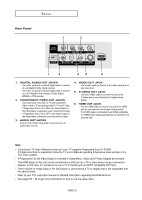
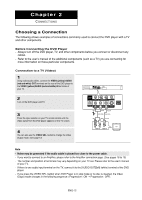
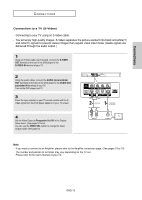
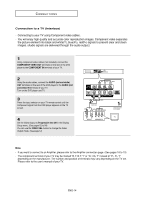
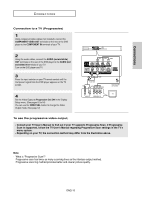
SETUP Rear Panel 1 2 1 3 45 6 1. DIGITAL AUDIO OUT JACKS - Use either an optical or coaxial digital cable to connect to a compatible Dolby Digital receiver. - Use either an optical or coaxial digital cable to connect to an A/V Amplifier that contains a Dolby Digital, MPEG2 or DTS decoder. 2. COMPONENT VIDEO OUT JACKS - Use these jacks if you have a TV with Component Video in jacks. These jacks provide PR, PB and Y video. - If Progressive Out is set to ON in the Video Output of the Setup Menu, progressive scan mode will be output. - If Progressive Out is set to OFF in the Video Output of the Setup Menu, interlaced scan video will be output. 3. AUDIO OUT JACKS Connect to the Audio input jacks of your television or audio/video receiver 4. VIDEO OUT JACK - Use a video cable to connect to the Video input jack on your television. 5. S-VIDEO OUT JACK - Use the S-Video cable to connect this jack to the S-Video jack on your television for higher picture quality. 6. HDMI OUT JACK - Use the HDMI cable to connect this jack to the HDMI jack on your television for the best quality picture. - If an HDMI cable is connected to an HDMI-compatible TV, HDMI will be output automatically a maximum of 10 seconds later. Note - Consult your TV User's Manual to find out if your TV supports Progressive Scan (P-SCAN). If Progressive Scan is supported, follow the TV User's Manual regarding Progressive Scan settings in the TV's menu system. - If Progressive Out On Video Output is selected in Setup Menu, Video and S-Video Outputs do not work. - The HDMI output of this unit can be connected to a DVI jack on a TV or other device using a conversion adapter. In this case, it is necessary to use a TV or display with an HDCP-compatible DVI input. - There may be no image output if the DVD player is connected to a TV or display that is not compatible with the above format. - Refer to your TV's instruction manual for detailed information regarding the HDMI terminal. - See pages 52 ~ 54 to get more information on how to use the setup menu. ENG-10
-
 1
1 -
2
-
3
-
4
-
 5
5 -
 6
6 -
 7
7 -
 8
8 -
 9
9 -
 10
10 -
 11
11 -
 12
12 -
 13
13 -
 14
14 -
 15
15 -
16
-
17
-
18
-
19
-
20
-
21
-
22
-
23
-
24
-
25
-
26
-
27
-
28
-
29
-
30
-
31
-
32
-
33
-
34
-
35
-
36
-
37
-
38
-
39
-
40
-
41
-
42
-
43
-
44
-
45
-
46
-
47
-
48
-
49
-
50
-
51
-
52
-
53
-
54
-
55
-
56
-
57
-
58
-
59
-
60
-
61
-
62
-
63
-
64
 |
 |