Samsung DVD-R120 Quick Guide (easy Manual) (ver.1.0) (English) - Page 30
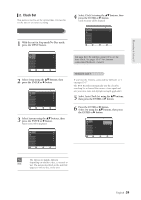
Select the sub menuClock Data CH, Time, Zone or Daylight Saving using the, buttons, then press - manual english
 |
View all Samsung DVD-R120 manuals
Add to My Manuals
Save this manual to your list of manuals |
Page 30 highlights
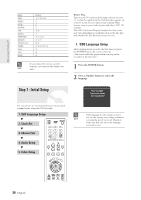
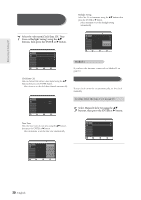
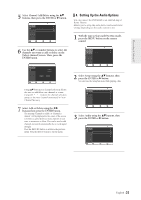
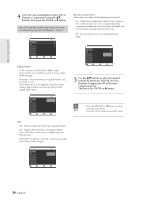
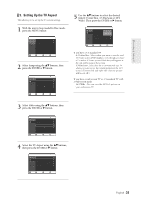
Connecting & Setting UP If your clock is set to the wrong time zone or daylight saving, you can adjust these settings without tuning off the Auto Clock Set function. Daylight Saving Select Yes, No or Automatic using the ...† buttons then press the ENTER or √ button. q Select Automatic to set the daylight saving automatically 7 Select the sub menu(Clock Data CH, Time Zone or Daylight Saving) using the ...† buttons, then press the ENTER or √ button. No Disc Timer Rec. Setup Auto Clock Set Clock Data CH Time Zone Daylight Saving Auto Clock Set : On √ : Automatic √ : Automatic √ : Automatic √ MOVE SELECT RETURN EXIT No Disc Timer Rec. Setup Auto Clock Set Clock Data CH Time Zone Daylight Saving Auto Clock Set : On √ : Automatic √ : Automatic √ : Automatic √ No Yes MOVE SELECT RETURN EXIT Method 2 If you have the Antenna connected via Method 2 on page 16. Clock Data CH Select a channel that carries a time signal using the ...† buttons then press the ENTER button. q Select Auto to set the clock data channel automatically. No Disc Timer Rec. Setup Clock Data CH Select channel : 01 MOVE SELECT RETURN EXIT Time Zone Select the time zone of your area using the ...† buttons then press the ENTER or √ button. q Select Automatic to set the time zone automatically. No Disc Timer Rec. Setup Auto Clock Set Clock Data CH Time Zone Daylight Saving Auto Clock Set Automatic Atlantic Eastern Central Mountain Pacific Alaska Hawaii MOVE SELECT RETURN EXIT Manual Clock Set If your clock cannot be set automatically, set the clock manually. To setup, follow the steps 1 to 4 in page 29. 5 Select Manual Clock Set using the ...† buttons, then press the ENTER or √ button. No Disc Timer Rec. Auto Clock Set Setup Manual Clock Set Clock Set √ √ MOVE SELECT RETURN EXIT 30- English
-
 1
1 -
2
-
3
-
4
-
5
-
6
-
7
-
8
-
9
-
10
-
11
-
12
-
13
-
14
-
15
-
16
-
17
-
18
-
19
-
20
-
21
-
22
-
23
-
24
-
 25
25 -
 26
26 -
 27
27 -
 28
28 -
 29
29 -
 30
30 -
 31
31 -
 32
32 -
 33
33 -
 34
34 -
 35
35 -
36
-
37
-
38
-
39
-
40
-
41
-
42
-
43
-
44
-
45
-
46
-
47
-
48
-
49
-
50
-
51
-
52
-
53
-
54
-
55
-
56
-
57
-
58
-
59
-
60
-
61
-
62
-
63
-
64
-
65
-
66
-
67
-
68
-
69
-
70
-
71
-
72
-
73
-
74
-
75
-
76
-
77
-
78
-
79
-
80
-
81
-
82
-
83
-
84
-
85
-
86
-
87
-
88
-
89
-
90
-
91
-
92
-
93
-
94
-
95
-
96
-
97
-
98
 |
 |