Samsung DVD-R120 Quick Guide (easy Manual) (ver.1.0) (English) - Page 43
Setting a Timer Recording
 |
View all Samsung DVD-R120 manuals
Add to My Manuals
Save this manual to your list of manuals |
Page 43 highlights
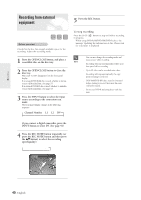
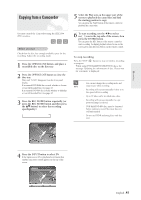
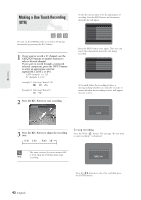
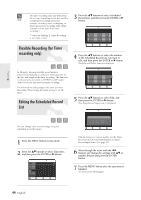
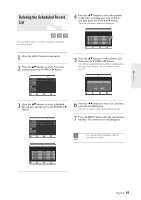
Setting a Timer Recording You need to set clock (Setup - Clock Set) before proceeding with a timer recording. (See page 29) 1 Press the OPEN/CLOSE button, and place a recordable disc on the disc tray. 2 Press the OPEN/CLOSE button to close the disc tray. Wait until "LOAD" disappears from the front panel display. If an unused DVD-RAM disc is used, whether to format or not will be asked first. (See page 37) If an unused DVD-RW disc is used, whether to initialize or not will be asked first. (See page 37) 3 Press the MENU button in stop mode. You can also set a timer recording via the TIMER button. 4 Press the ...† buttons to select Timer Rec., and then press the ENTER or √ button. DVD-RAM(VR) Timer Record Title List Timer Record √ Playlist Scheduled Record List √ Disc manager Timer Rec. Setup MOVE SELECT RETURN EXIT 5 Press the ...† buttons to select Timer Record, and then press the ENTER or √ button. The Timer Record Input items are displayed. DVD-RAM(VR) Scheduled Record List Recordable Time 02:12 SP No. Source 01 -- -- Date Start End Mode Edit --/-- No-.-0:1 Source Date Start End Mode CH 09 01/01 12 : 00 AM 02 : 00 AM SP Recordable Time 02:12 SP MOVE SELECT RETURN EXIT 6 Fill in the items using the buttons. œ √ : Moves to the previous/next item, ...† 0~9 : Sets a value. q Source: The video input source (L1, L2), or the broadcasting channel you want to make a timer recording of. When selecting channels to be recorded, the ...† buttons on the remote control can let you select only the channels that have been memorized during Auto Scan. For the selection of other channels, use the number buttons. q Date: Date that the timer recording starts ... ... 01/01 01/02 01/30 01/31 Every Day MON-SAT MON-FRI Every SAT Every SUN q Start/End Time: Start and end time of the timer recording q Mode (Recording mode) XP (High quality): Approx. 1 hour SP (Standard quality): Approx. 2 hours LP (Long recording): Approx. 4 hours EP (Extended): Approx. 6 hours or 8 hours. FR (Flexible Recording): See page 44. s When you are recording at EP mode on a DVD-RW(V)/R disc, it may not record the NOTE full 6 or 8 hours because the unit uses the VBR(Variable Bit Rate) ENCODING system. For example, if you record a program with a lot of action, it uses a higher bit rate which in turn consumes more disc memory. 7 Press the ENTER button. DVD-RAM(VR) Scheduled Record List Recordable Time 02:12 SP No. Source 01 CH 09 02 -- -- Date 01/01 - -/- - Start End Mode Edit 12:00 AM 02:00 AM SP MOVE SELECT RETURN EXIT q ( ) and Timer Set will appear on the front panel display. This means that a timer recording is set. q Recording is automatically performed when the set time is reached. s If you make a mistake NOTE Press the œ √ button to select the item you want to change. s If the timer settings overlap The programs are recorded in order of priority. If timer recording is set for the first program and then again for the second program and both programs overlap, the following message will appear on the screen: 'This setting is identical with 1' The message shows that the first program has priority. After recording of the first program is complete, the second program starts being recorded. s To exit without saving the current setting Press the MENU or TIMER button. s To return to the previous menu Press the RETURN button if you don't want to set a timer recording. English -43 Recording
-
 1
1 -
2
-
3
-
4
-
5
-
6
-
7
-
8
-
9
-
10
-
11
-
12
-
13
-
14
-
15
-
16
-
17
-
18
-
19
-
20
-
21
-
22
-
23
-
24
-
25
-
26
-
27
-
28
-
29
-
30
-
31
-
32
-
33
-
34
-
35
-
36
-
37
-
 38
38 -
 39
39 -
 40
40 -
 41
41 -
 42
42 -
 43
43 -
 44
44 -
 45
45 -
 46
46 -
 47
47 -
 48
48 -
49
-
50
-
51
-
52
-
53
-
54
-
55
-
56
-
57
-
58
-
59
-
60
-
61
-
62
-
63
-
64
-
65
-
66
-
67
-
68
-
69
-
70
-
71
-
72
-
73
-
74
-
75
-
76
-
77
-
78
-
79
-
80
-
81
-
82
-
83
-
84
-
85
-
86
-
87
-
88
-
89
-
90
-
91
-
92
-
93
-
94
-
95
-
96
-
97
-
98
 |
 |