Samsung MC17J8000C User Manual - Page 18
Accessory usage - Use accessories in the combinations shown below, Using the slim fry button
 |
View all Samsung MC17J8000C manuals
Add to My Manuals
Save this manual to your list of manuals |
Page 18 highlights
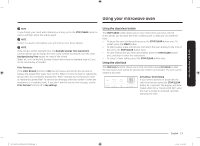
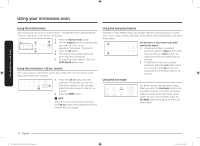
Using your microwave oven Using your microwave oven NOTE Check food when the oven signals. After the final stage, small sections may still be icy. Let them stand to continue thawing. Food is not fully defrosted until all ice crystals have thawed. Shielding roasts and steaks with small pieces of foil prevents the edges from cooking before the center of the food has defrosted. Use narrow, flat, smooth strips of aluminum foil to cover the edges and thinner sections of the food. Accessory usage - Use accessories in the combinations shown below A Ceramic Enamel Tray Low Rack Glass Tray Guide Roller Coupler D High Rack Ceramic Enamel Tray Glass Tray Guide Roller Coupler B Low Rack Ceramic Enamel Tray Glass Tray Guide Roller Coupler F Glass Tray Guide Roller Coupler C Ceramic Enamel Tray High Rack Glass Tray Guide Roller Coupler Using the slim fry button The Slim Fry menu contains pre-set cooking programs for 9 different items. You do not need to set the cooking times or the power level. 1. Place the food on the tray or the rack. 2 (See Accessory Usage on page 18) 2. Press the Slim Fry button. 3. To select the number that corresponds 35 4 to the food, press the Up&Down key or one of the numeric buttons. (Refer to the table on the next page.) 6 4. Press the OK button. 5. Enter the amount of food by pressing the Up&Down key or one of the numeric buttons. (Refer to the table on the next page.) 6. Press the START button. The microwave oven will automatically operate for the pre-programmed time. 18 English MC17J8000CG_AA_DE68-04224E-02_EN+MES.indb 18 7/11/2018 11:13:13 AM
-
 1
1 -
2
-
3
-
4
-
5
-
6
-
7
-
8
-
9
-
10
-
11
-
12
-
 13
13 -
 14
14 -
 15
15 -
 16
16 -
 17
17 -
 18
18 -
 19
19 -
 20
20 -
 21
21 -
 22
22 -
 23
23 -
24
-
25
-
26
-
27
-
28
-
29
-
30
-
31
-
32
-
33
-
34
-
35
-
36
-
37
-
38
-
39
-
40
-
41
-
42
-
43
-
44
-
45
-
46
-
47
-
48
-
49
-
50
-
51
-
52
-
53
-
54
-
55
-
56
-
57
-
58
-
59
-
60
-
61
-
62
-
63
-
64
-
65
-
66
-
67
-
68
-
69
-
70
-
71
-
72
-
73
-
74
-
75
-
76
-
77
-
78
-
79
-
80
-
81
-
82
-
83
-
84
-
85
-
86
-
87
-
88
-
89
-
90
-
91
-
92
-
93
-
94
-
95
-
96
-
97
-
98
-
99
-
100
-
101
-
102
-
103
-
104
-
105
-
106
-
107
-
108
-
109
-
110
-
111
-
112
 |
 |
