Samsung ML-4551N User Manual (ENGLISH) - Page 23
Printing a demo Changing the display language, Using toner save mode - printer driver
 |
UPC - 635753624113
View all Samsung ML-4551N manuals
Add to My Manuals
Save this manual to your list of manuals |
Page 23 highlights
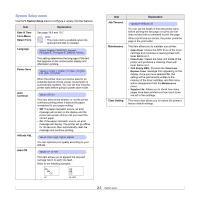
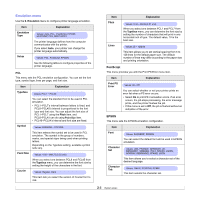
Printing a demo page After setting up your printer, print a demo page to make sure that the printer is operating correctly. Press and hold Demo for about 2 seconds. Or, 1 Press Menu and then OK when 1. Information appears. 2 Press the Scroll buttons until Demo Page appears and press OK. 3 Press OK when Yes appears. A demo page prints out. Changing the display language To change the language that is displayed on the control panel, follow these steps: 1 Press Menu until 5. System Setup appears on the bottom line of the display and press OK. 2 Press the Scroll buttons until Language appears and press OK. 3 Press the Scroll buttons to select the language you want and press OK. 4 Press Stop to return to Standby mode. Using toner save mode Toner save mode allows the printer to use less toner on each page. Activating this mode extends the life of your toner cartridge and reduces your cost per page beyond what one would experience in the normal mode, but it reduces print quality. This setting is not available with the 1200dpi-Best setting. There are two ways to enable this mode: Using the control panel button Press Toner Save on the control panel. The printer must be in Standby mode; the Status LED lights green and Ready is shown on the display. • If the button backlight is on, the mode is enabled and the printer uses less toner to print a page. • If the button backlight is off, the mode is disabled and the printer prints in normal mode. From the software application You can set toner save mode from the printer properties window on your printer driver. See the Software Section. Changing the font setting Your machine has preset the font for your region or country. If you want to change the font which you prefer or set the font under special condition such as the DOS environment, you can change the font setting as follows: 1 Press Menu on the control panel until you see 6. Emulation feature. 2 Press OK to access the font setting. 3 Press the left/right arrow until Setup displays. 4 Press the left/right arrow until PCL displays. 5 Press the left/right arrow until Symbol displays. 6 Press the left/right arrow until your preferred font displays. 7 Press OK. 8 Press Stop to return to machine ready mode. Note Following information shows the proper font list for corresponding languages. •Russian: CP866, Cyrillic •Hebrew: 15Q, 8H, 0H (Israel only) •Greek: GREEK, PC737 •Arabic & Farsi: ARABIC8, WINARABIC, PC864, FARSI, ISOARABIC. 2.8
-
 1
1 -
2
-
3
-
4
-
5
-
6
-
7
-
8
-
9
-
10
-
11
-
12
-
13
-
14
-
15
-
16
-
17
-
 18
18 -
 19
19 -
 20
20 -
 21
21 -
 22
22 -
 23
23 -
 24
24 -
 25
25 -
 26
26 -
 27
27 -
 28
28 -
29
-
30
-
31
-
32
-
33
-
34
-
35
-
36
-
37
-
38
-
39
-
40
-
41
-
42
-
43
-
44
-
45
-
46
-
47
-
48
-
49
-
50
-
51
-
52
-
53
-
54
-
55
-
56
-
57
-
58
-
59
-
60
-
61
-
62
-
63
-
64
-
65
-
66
-
67
-
68
-
69
-
70
-
71
-
72
-
73
-
74
-
75
-
76
-
77
-
78
-
79
-
80
-
81
-
82
-
83
-
84
-
85
-
86
-
87
-
88
-
89
-
90
-
91
-
92
-
93
-
94
-
95
-
96
-
97
-
98
-
99
-
100
-
101
-
102
-
103
-
104
-
105
-
106
-
107
-
108
-
109
-
110
-
111
-
112
 |
 |