Samsung ML-4551N User Manual (ENGLISH) - Page 62
Setting the memory in the PostScript printer properties, Samsung ML-4550 Series PS - ml drivers
 |
UPC - 635753624113
View all Samsung ML-4551N manuals
Add to My Manuals
Save this manual to your list of manuals |
Page 62 highlights
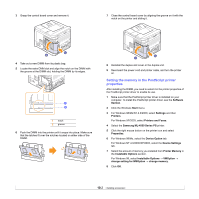
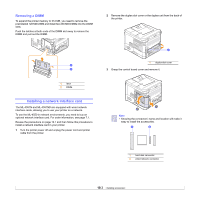
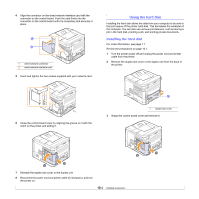
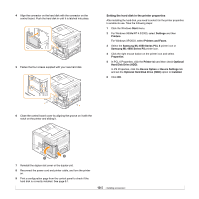
3 Grasp the control board cover and remove it. 7 Close the control board cover by aligning the groove on it with the notch on the printer and sliding it. 4 Take out a new DIMM from its plastic bag. 5 Locate the extra DMM slot and align the notch on the DIMM with the groove at the DIMM slot, holding the DIMM by its edges. 1 2 1 notch 2 groove 6 Push the DIMM into the printer until it snaps into place. Make sure that the latches fit over the notches located on either side of the DIMM. 8 Reinstall the duplex-slot cover or the duplex unit. 9 Reconnect the power cord and printer cable, and turn the printer on. Setting the memory in the PostScript printer properties After installing the DIMM, you need to select it in the printer properties of the PostScript printer driver to enable its use. 1 Make sure that the PostScript printer driver is installed on your computer. To install the PostScript printer driver, see the Software Section. 2 Click the Windows Start menu. 3 For Windows 98/Me/NT 4.0/2000, select Settings and then Printers. For Windows XP/2003, select Printers and Faxes. 4 Select the Samsung ML-4550 Series PS printer. 5 Click the right mouse button on the printer icon and select Properties. 6 For Windows 98/Me, select the Device Option tab. For Windows NT 4.0/2000/XP/2003, select the Device Settings tab. 7 Select the amount of memory you installed from Printer Memory in the Installable Options section. For Windows 98, select Installable Options → VMOption → change setting for:NMOption → change memory. 8 Click OK. 10.2
-
 1
1 -
2
-
3
-
4
-
5
-
6
-
7
-
8
-
9
-
10
-
11
-
12
-
13
-
14
-
15
-
16
-
17
-
18
-
19
-
20
-
21
-
22
-
23
-
24
-
25
-
26
-
27
-
28
-
29
-
30
-
31
-
32
-
33
-
34
-
35
-
36
-
37
-
38
-
39
-
40
-
41
-
42
-
43
-
44
-
45
-
46
-
47
-
48
-
49
-
50
-
51
-
52
-
53
-
54
-
55
-
56
-
 57
57 -
 58
58 -
 59
59 -
 60
60 -
 61
61 -
 62
62 -
 63
63 -
 64
64 -
 65
65 -
 66
66 -
 67
67 -
68
-
69
-
70
-
71
-
72
-
73
-
74
-
75
-
76
-
77
-
78
-
79
-
80
-
81
-
82
-
83
-
84
-
85
-
86
-
87
-
88
-
89
-
90
-
91
-
92
-
93
-
94
-
95
-
96
-
97
-
98
-
99
-
100
-
101
-
102
-
103
-
104
-
105
-
106
-
107
-
108
-
109
-
110
-
111
-
112
 |
 |
