Samsung RF30HBEDBSR User Manual Ver.00 (English, French(france), Spanish) - Page 15
Re-assembling The Freezer, Adjusting The Level
 |
View all Samsung RF30HBEDBSR manuals
Add to My Manuals
Save this manual to your list of manuals |
Page 15 highlights
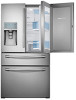
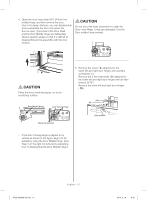
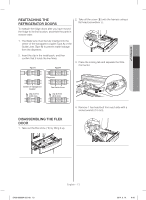
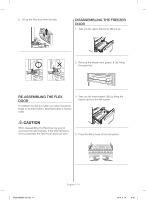
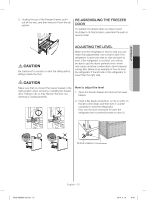
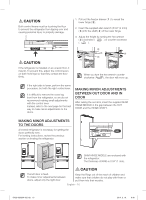
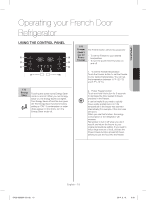
SETTING UP 5. Holding the top of the Freezer Drawer, pull it out all the way, and then remove it from the rail system. RE-ASSEMBLING THE FREEZER DOOR To reattach the drawer after you have moved the fridge to its final location, assemble the parts in reverse order. CAUTION Be careful not to scratch or dent the sliding rail by letting it strike the floor. ADJUSTING THE LEVEL Make sure the refrigerator is level so that you can make final adjustments. Use a level to test if the refrigerator is level both side to side and back to front. If the refrigerator is not level, you will not be able to get the doors perfectly even, which may cause moisture condensation and increased energy bills. Below is an example of how to level the refrigerator if the left side of the refrigerator is lower than the right side. CAUTION Make sure that you mount the freezer basket in the right position when removing / installing the freezer door. Failing to do so may result in the door not opening or closing properly. How to adjust the level 1. Open the freezer drawer and remove the lower basket. 2. Insert a flat-blade screwdriver (-) into a notch on the left control lever, and then turn it counterclockwise to level the refrigerator. (You turn the lever clockwise to lower the refrigerator and counterclockwise to raise it.) flat-blade screwdriver (-) Control Lever DA68-03030A-00.indb 15 English - 15 2014. 3. 19. 9:48
-
 1
1 -
2
-
3
-
4
-
5
-
6
-
7
-
8
-
9
-
 10
10 -
 11
11 -
 12
12 -
 13
13 -
 14
14 -
 15
15 -
 16
16 -
 17
17 -
 18
18 -
 19
19 -
 20
20 -
21
-
22
-
23
-
24
-
25
-
26
-
27
-
28
-
29
-
30
-
31
-
32
-
33
-
34
-
35
-
36
-
37
-
38
-
39
-
40
-
41
-
42
-
43
-
44
-
45
-
46
-
47
-
48
-
49
-
50
-
51
-
52
-
53
-
54
-
55
-
56
-
57
-
58
-
59
-
60
-
61
-
62
-
63
-
64
-
65
-
66
-
67
-
68
-
69
-
70
-
71
-
72
-
73
-
74
-
75
-
76
-
77
-
78
-
79
-
80
-
81
-
82
-
83
-
84
-
85
-
86
-
87
-
88
-
89
-
90
-
91
-
92
-
93
-
94
-
95
-
96
-
97
-
98
-
99
-
100
-
101
-
102
-
103
-
104
-
105
-
106
-
107
-
108
-
109
-
110
-
111
-
112
-
113
-
114
-
115
-
116
-
117
-
118
-
119
-
120
-
121
-
122
-
123
-
124
-
125
-
126
-
127
-
128
-
129
-
130
-
131
-
132
 |
 |
