Samsung SCH-M828C User Manual (user Manual) (ver.f6) (English(north America)) - Page 82
Editing a Contacts Entry, Adding a Number to a Contacts Entry, to assign an existing IM client contact
 |
View all Samsung SCH-M828C manuals
Add to My Manuals
Save this manual to your list of manuals |
Page 82 highlights
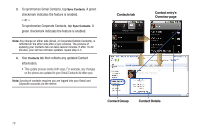
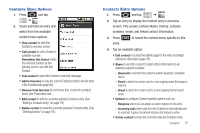
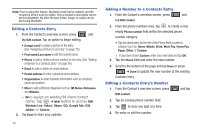
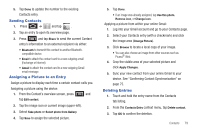
Note: Prior to using this feature, Bluetooth must first be enabled, and the recipient's device must be visible. Only a Contact's information can be sent via Bluetooth. No other file type (video, image, or audio) can be sent using Bluetooth. Editing a Contacts Entry 1. From the Contact's overview screen, press and tap Edit contact. Tap an option to begin editing. • [image icon] to assign a picture to the entry. (See "Assigning a Picture to an Entry" on page 79.) • First name/Last name to edit the current name. • Phone to add or delete a phone number to the entry. (See "Adding a Number to a Contacts Entry" on page 78.) • Email to add or delete an email address. • Postal address to enter a physical street address. • Organization to enter business information such as company name and position. • More to add additional categories such as: IM, Notes, Nickname, and Website. ● IM to assign an existing IM client contact name. Tap ➔ label button to access AIM, Windows Live, Yahoo!, Skype, QQ, Google Talk, ICQ, Jabber, or Custom. 2. Tap Done to store your updates. 78 Adding a Number to a Contacts Entry 1. From the Contact's overview screen, press and tap Edit contact. 2. From the phone numbers area, tap to create a new empty Phone number field within the selected phone number category. • Tap the label button (to the left of the Phone field) to select a category such as: Home, Mobile, Work, Work Fax, Home Fax, Pager, Other, or Custom. ● If you have chosen Custom, enter your new label and tap OK. 3. Tap the Phone field and enter the new number. 4. Scroll to the bottom of the page and tap Done or press ➔ Done to update the new number to the existing Contacts entry. Editing a Contacts Entry's Number 1. From the Contact's overview screen, press and tap Edit contact. 2. Tap an existing phone number field. 3. Tap to clear one digit at a time. 4. Re-enter or edit the number.
-
 1
1 -
2
-
3
-
4
-
5
-
6
-
7
-
8
-
9
-
10
-
11
-
12
-
13
-
14
-
15
-
16
-
17
-
18
-
19
-
20
-
21
-
22
-
23
-
24
-
25
-
26
-
27
-
28
-
29
-
30
-
31
-
32
-
33
-
34
-
35
-
36
-
37
-
38
-
39
-
40
-
41
-
42
-
43
-
44
-
45
-
46
-
47
-
48
-
49
-
50
-
51
-
52
-
53
-
54
-
55
-
56
-
57
-
58
-
59
-
60
-
61
-
62
-
63
-
64
-
65
-
66
-
67
-
68
-
69
-
70
-
71
-
72
-
73
-
74
-
75
-
76
-
 77
77 -
 78
78 -
 79
79 -
 80
80 -
 81
81 -
 82
82 -
 83
83 -
 84
84 -
 85
85 -
 86
86 -
 87
87 -
88
-
89
-
90
-
91
-
92
-
93
-
94
-
95
-
96
-
97
-
98
-
99
-
100
-
101
-
102
-
103
-
104
-
105
-
106
-
107
-
108
-
109
-
110
-
111
-
112
-
113
-
114
-
115
-
116
-
117
-
118
-
119
-
120
-
121
-
122
-
123
-
124
-
125
-
126
-
127
-
128
-
129
-
130
-
131
-
132
-
133
-
134
-
135
-
136
-
137
-
138
-
139
-
140
-
141
-
142
-
143
-
144
-
145
-
146
-
147
-
148
-
149
 |
 |