Samsung SCW71 User Manual (user Manual) (ver.1.0) (English, Spanish) - Page 51
Maintenance, Mantenimiento
 |
View all Samsung SCW71 manuals
Add to My Manuals
Save this manual to your list of manuals |
Page 51 highlights
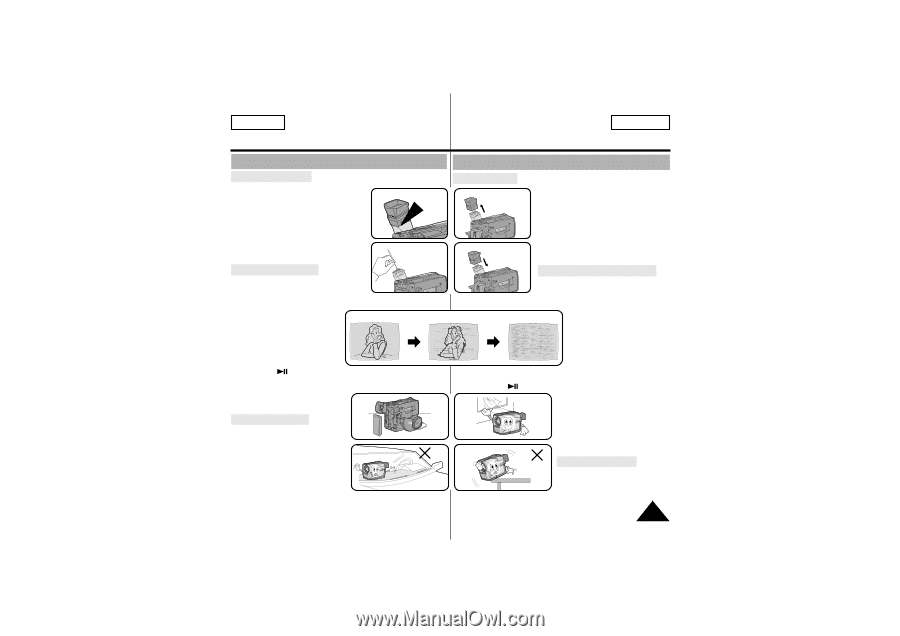
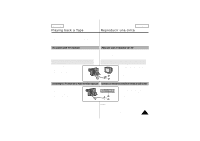
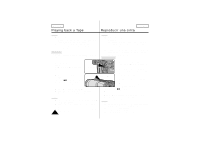
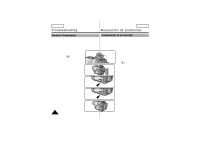
ENGLISH Maintenance Mantenimiento ESPAÑOL Cleaning and Taking care of the Camcorder Cleaning the Viewfinder x Releasing the Eyecup 1. Pull the VIEWFINDER up and then turn 1 the screw counter-clockwise. 2. Pull the EYECUP out. 3. Clean the EYECUP and the VIEWFIND- ER screen with a soft cloth and cotton swab or a blower. x Reattaching the Eyecup 4. Put the EYECUP on the VIEWFINDER. 3 5. Put the screw back on. Cleaning the Video Heads 1 To ensure normal recording and clear pictures, clean the video heads. 1 When the playback pictures are noisy or hardly visible, the video heads may be dirty. a. Normal Picture b, c. Noisy Picture a b If this happens, clean the video heads with a dry type cassette cleaner. 1. Set the power switch to PLAYER mode. 2. Insert the cleaning tape. 3. Press the (PLAY/STILL) button. 4. Press the s (STOP) button after about 30 seconds. Check the quality of the picture using a video cassette. If it is stil bad, repeat the operation. If the problem continues, contact your 1 local authorized service center. Storing the Camcorder 1. You must detach the BATTERY PACK from the camcorder when storing. 2. Keep the camcorder in a ventilat- 3 ed, dry and warm place. 3. Do not keep the camcorder in a place where the temperature often changes, such as in a car. 4. Keep the camcorder in a stable place. Limpieza y cuidados de la Videocámara Limpieza del Visor x Como desmontar el Ocular 2 1. Tire del VISOR hacia arriba y gire el tornillo en sentido antihorario. 2. Saque el Ocular. 3. Limpie el Ocular y la pantalla del VISOR con un paño suave, copo de algodón o un soplador. x Colocación del Ocular 4 4. Ponga el Ocular en el VISOR. 5. Apriete el tornillo. Limpieza de los cabezales del vídeo 1 Para asegurar filmaciones normales e imágenes claras, limpie los cabezales de vídeo. 1 Si las imágenes reproducidas c tienen ruido o no se ven fácilmente puede que los cabezales del vídeo estén sucios. a. Imagen normal b, c. Imagen con ruido Si esto sucede, limpie los cabezales del vídeo con una cinta de limpieza de tipo seco. 1. Ponga el interruptor de encendido en el modo PLAYER. 2. Introduzca una cinta de limpieza de tipo seco. 3. Pulse el botón (PLAY/STILL). 4. Pulse el botón s (STOP) transcurri 2 dos 30 segundos. Compruebe la calidad de la imagen utilizando una cinta de vídeo. Si la imagen todavía no es buena, repita la operación. Si el problema continúa, póngase en contacto con su servicio 4 técnico autorizado. Guardar la videocámara 1. Debe retirar la BATTERY PACK de la videocámara antes de guardarla. 2. Guarde la videocámara en un lugar ventilado, seco y con una temperatura suave. 3. No guarde la videocámara en un lugar donde haya cambios bruscos de temperatura, como en un coche. 4. Guarde la videocámara en un lugar estable. 51
-
 1
1 -
2
-
3
-
4
-
5
-
6
-
7
-
8
-
9
-
10
-
11
-
12
-
13
-
14
-
15
-
16
-
17
-
18
-
19
-
20
-
21
-
22
-
23
-
24
-
25
-
26
-
27
-
28
-
29
-
30
-
31
-
32
-
33
-
34
-
35
-
36
-
37
-
38
-
39
-
40
-
41
-
42
-
43
-
44
-
45
-
 46
46 -
 47
47 -
 48
48 -
 49
49 -
 50
50 -
 51
51 -
 52
52 -
 53
53 -
 54
54 -
 55
55 -
 56
56 -
57
-
58
-
59
-
60
 |
 |