Samsung SCX 6555N User Manual (ENGLISH) - Page 74
Browsing the machine’s status, General settings, Date & Time
 |
UPC - 635753610314
View all Samsung SCX 6555N manuals
Add to My Manuals
Save this manual to your list of manuals |
Page 74 highlights
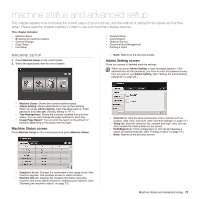
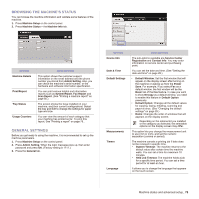
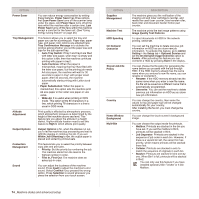
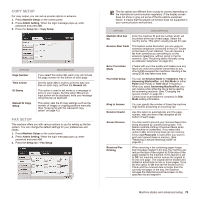
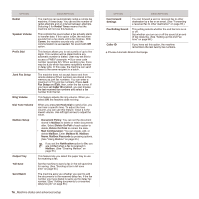
BROWSING THE MACHINE'S STATUS You can browse the machine information and validate some features of the machine. 1. Press Machine Setup on the control panel. 2. Press Machine Status > the Machine Info tab. OPTION Machine Details Print/Report Tray Status Usage Counters DESCRIPTION This option shows the customer support information on the email address and the phone number you stored from Admin Setting. Also, you can check the machine's serial number, or the hardware and software information specification. You can print various helpful and informative reports such as System Report, Fax Report and Scan Report. (See "Printing a machine report" on page 80.) The screen shows the trays installed on your machine, and their current configurations. Select the tray and Edit to change the settings for paper type and size. You can view the amount of each category that your machine has printed so far. To print this report, See "Printing a report" on page 79.. GENERAL SETTINGS Before you get ready to using the machine, it is recommended to set up the machine parameters. 1. Press Machine Setup on the control panel. 2. Press Admin Setting. When the login message pops up, then enter password and press OK. (Factory setting is 1111.) 3. Press the General tab. OPTION Device Info Date & Time Default Settings Measurements Timers Language DESCRIPTION The sub-options available are Service Center Registration and Contact Info. You may enter information on service center and purchasing point. You can set the date and time. (See "Setting the date and time" on page 28.) • Default Window: Set the first window that will appear on the display screen after turning on the machine or waking up from the Power Save. For example, if you select Fax as a default window, the first window will be the Basic tab of the Fax feature. In case you want to show ID Copy as a default window, you need to enable this feature in Default Option previously. • Default Option: Changes all the default values for copying, faxing, emailing, scanning and paper at once. (See "Changing the default settings" on page 29.) • Home: Changes the order of windows that will appears on the display screen. Depending on the optional kit you installed or the category you selected, the selectable options on the display screen may differ. This option lets you change the measurement unit to use (mm or inch), and set the numeric separation (comma or period). The machine cancels a printing job if data does not be received in specific time. • System Timeout: The machine returns to the default value after certain time the machine waits. You can set a time for maximum 10 minutes. • Held Job Timeout: The machine holds a job for a specific time period. You can set a time period for at least an hour. It allows you to change the language that appears on the touch screen. Machine status and advanced setup_ 73
-
 1
1 -
2
-
3
-
4
-
5
-
6
-
7
-
8
-
9
-
10
-
11
-
12
-
13
-
14
-
15
-
16
-
17
-
18
-
19
-
20
-
21
-
22
-
23
-
24
-
25
-
26
-
27
-
28
-
29
-
30
-
31
-
32
-
33
-
34
-
35
-
36
-
37
-
38
-
39
-
40
-
41
-
42
-
43
-
44
-
45
-
46
-
47
-
48
-
49
-
50
-
51
-
52
-
53
-
54
-
55
-
56
-
57
-
58
-
59
-
60
-
61
-
62
-
63
-
64
-
65
-
66
-
67
-
68
-
 69
69 -
 70
70 -
 71
71 -
 72
72 -
 73
73 -
 74
74 -
 75
75 -
 76
76 -
 77
77 -
 78
78 -
 79
79 -
80
-
81
-
82
-
83
-
84
-
85
-
86
-
87
-
88
-
89
-
90
-
91
-
92
-
93
-
94
-
95
-
96
-
97
-
98
-
99
-
100
-
101
-
102
-
103
-
104
-
105
-
106
-
107
-
108
-
109
-
110
-
111
-
112
-
113
-
114
-
115
-
116
-
117
-
118
-
119
-
120
-
121
-
122
-
123
-
124
-
125
-
126
-
127
-
128
-
129
-
130
-
131
-
132
-
133
-
134
-
135
-
136
-
137
-
138
-
139
-
140
-
141
-
142
-
143
-
144
-
145
-
146
-
147
-
148
-
149
-
150
-
151
-
152
-
153
-
154
-
155
-
156
-
157
-
158
-
159
-
160
-
161
-
162
-
163
-
164
-
165
-
166
-
167
-
168
-
169
-
170
-
171
-
172
-
173
-
174
-
175
 |
 |
