Samsung SCX 6555N User Manual (ENGLISH) - Page 96
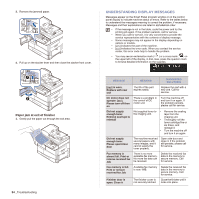
Paper Jam In Mp, Message, Meaning, Suggested, Solutions
 |
UPC - 635753610314
View all Samsung SCX 6555N manuals
Add to My Manuals
Save this manual to your list of manuals |
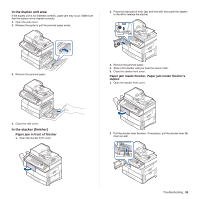
Page 96 highlights
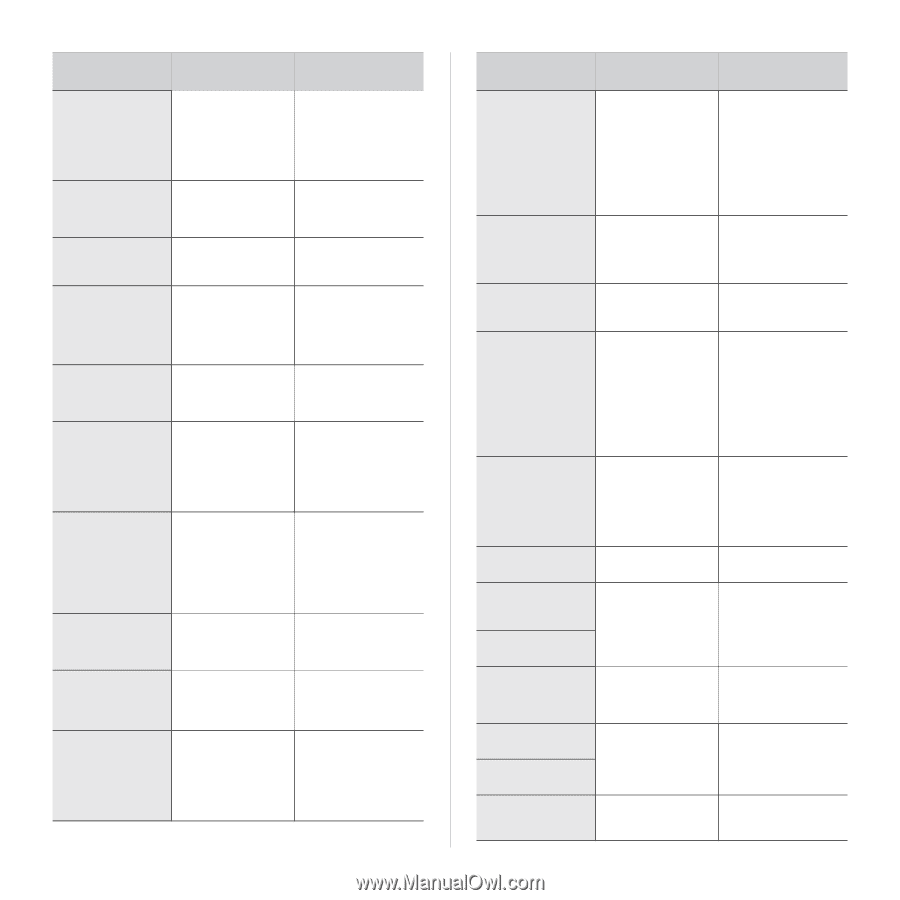
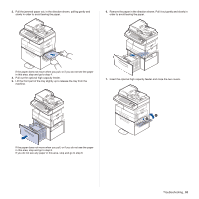
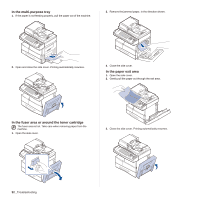
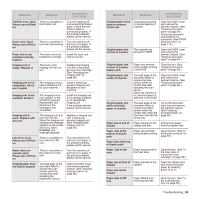
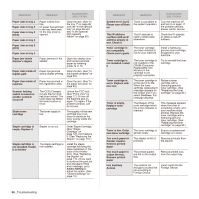
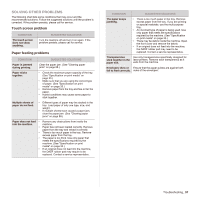
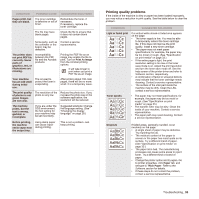
MESSAGE MEANING SUGGESTED SOLUTIONS Finisher error: [zzz]. There is a problem in Please turn off then the finisher unit. on Turn the machine off and reinstall the finisher again. Check that the finisher cable is connected properly. If the problem persists, please call for service. Fuser error: [zzz]. Please turn off then on There is a problem in the fuser unit working. Turn the machine off and turn it on again. If the problem persists, please call for service. Fuser unit is not installed correctly. Install it The fuser unit is not installed or correctly. Install the fuser unit. Call for service. Imaging unit is empty. Replace it The toner in the imaging unit has run out. Replace the imaging unit with a Samsunggenuine toner cartridge. (See "Replacing the imaging unit" on page 84.) Imaging unit is not compatible. Check user's guide The imaging unit you have installed is not for your machine. Install a Samsunggenuine imaging unit, designed for your machine. Imaging unit is not installed. Install it The imaging unit is not installed, or the CRUM (Consumer Replaceable Unit Monitor) in the cartridge is not connected. Install the imaging unit. If it is already installed, try to reinstall the imaging unit. If the problem persists, please call for service. Imaging unit is worn. Replace with new one The imaging unit is at the end of its life. When the imaging unit replacement message appears on the screen and if you select Continue, this message displays. Replace a imaging unit with a Samsunggenuine imaging unit. (See "Replacing the imaging unit" on page 84.) LSU error: [zzz]. Please turn off then on There is a problem in the control of LSU unit. Turn the machine off and turn it on again. If the problem persists, please call for service. Motor does not operate: [zzz]. Please turn off then on There is a problem in the control of motor unit. Turn the machine off and turn it on again. If the problem persists, please call for service. Original paper does not feed in scanner The lead edge of the document failed to actuate the scan sensor within the correct time after actuating the registration sensor. Open the DADF cover and remove jammed original. (See "Clearing document jams" on page 86.) MESSAGE MEANING SUGGESTED SOLUTIONS Original paper is too Oversized document long for scanner. or double-feeding of Check size originals. Open the DADF cover and remove the jammed original. (See "Clearing document jams" on page 86.) Check the document size whether it is supported. (See "DADF document size" on page 112.) Original paper jam in front of scanner The originals are jammed in DADF. Open the DADF cover and remove the jammed original. (See "Clearing document jams" on page 86.) Original paper jam in front of scanner duplex path Paper has jammed Clear the jam. (See during duplex printing "Clearing document in the DADF. jams" on page 86.) Original paper jam inside of scanner The lead edge of the document failed to actuate the gate sensor within the correct time after actuating the scan sensor. When the machine is on, jammed paper is detected in the DADF. Open the DADF cover and remove the jammed original. (See "Clearing document jams" on page 86.) Original paper jam while reversing paper in scanner The lead edge of the document failed to actuate the duplex sensor within the correct time when the document was fed the wrong way. Lift up the document input tray and remove the jammed original. (See "Clearing document jams" on page 86.) Paper jam at exit of Paper jammed in the Pull jammed paper finisher stacker exit part. from the stacker exit. Paper Jam at the bottom of duplex path Paper has jammed Clear the jam. (See "In during duplex printing. the duplex unit area" on page 93.) Paper Jam at the top of duplex path Paper Jam in exit area Paper has jammed in the fuser area. Clear the jam. (See "In the fuser area or around the toner cartridge" on page 92.) Paper jam in front of Paper jammed in the finisher stacker. Paper jam inside finisher Open the stacker door and remove jammed paper by lowering guide 1a or 1b. Paper Jam in MP tray Paper Misfed from multi-purpose tray Clear the jam. (See "In the multi-purpose tray" on page 92.) Troubleshooting_ 95
-
 1
1 -
2
-
3
-
4
-
5
-
6
-
7
-
8
-
9
-
10
-
11
-
12
-
13
-
14
-
15
-
16
-
17
-
18
-
19
-
20
-
21
-
22
-
23
-
24
-
25
-
26
-
27
-
28
-
29
-
30
-
31
-
32
-
33
-
34
-
35
-
36
-
37
-
38
-
39
-
40
-
41
-
42
-
43
-
44
-
45
-
46
-
47
-
48
-
49
-
50
-
51
-
52
-
53
-
54
-
55
-
56
-
57
-
58
-
59
-
60
-
61
-
62
-
63
-
64
-
65
-
66
-
67
-
68
-
69
-
70
-
71
-
72
-
73
-
74
-
75
-
76
-
77
-
78
-
79
-
80
-
81
-
82
-
83
-
84
-
85
-
86
-
87
-
88
-
89
-
90
-
 91
91 -
 92
92 -
 93
93 -
 94
94 -
 95
95 -
 96
96 -
 97
97 -
 98
98 -
 99
99 -
 100
100 -
 101
101 -
102
-
103
-
104
-
105
-
106
-
107
-
108
-
109
-
110
-
111
-
112
-
113
-
114
-
115
-
116
-
117
-
118
-
119
-
120
-
121
-
122
-
123
-
124
-
125
-
126
-
127
-
128
-
129
-
130
-
131
-
132
-
133
-
134
-
135
-
136
-
137
-
138
-
139
-
140
-
141
-
142
-
143
-
144
-
145
-
146
-
147
-
148
-
149
-
150
-
151
-
152
-
153
-
154
-
155
-
156
-
157
-
158
-
159
-
160
-
161
-
162
-
163
-
164
-
165
-
166
-
167
-
168
-
169
-
170
-
171
-
172
-
173
-
174
-
175
 |
 |