Samsung SWD-M100 User Manual (user Manual) (ver.f7) (English) - Page 65
Synchronizing Music with Windows Media Player, Finish, Start Sync
 |
View all Samsung SWD-M100 manuals
Add to My Manuals
Save this manual to your list of manuals |
Page 65 highlights
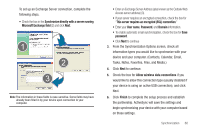
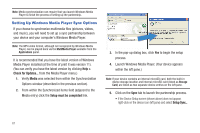
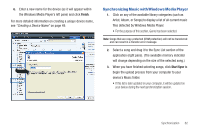
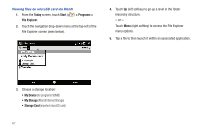
6. Enter a new name for the device (as it will appear within the Windows Media Player's left pane) and click Finish. For more detailed information on creating a unique device name, see "Creating a Device Name" on page 49. Synchronizing Music with Windows Media Player 1. Click on any of the available library categories (such as Artist, Album, or Songs) to display a list of all current music files detected by Windows Media Player. • For the purpose of this section, Genre has been selected. Note: Songs that are copy-protected (DRM protection) will not be transferred and can result in a transfer error message. 2. Select a song and drag it to the Sync List section of the application (right pane). (The available memory indicator will change depending on the size of the selected song.) 3. When you have finished selecting songs, click Start Sync to begin the upload process from your computer to your device's Music folder. • If this list is later updated on your computer, it will be updated on your device during the next synchronization session. Synchronization 62
-
 1
1 -
2
-
3
-
4
-
5
-
6
-
7
-
8
-
9
-
10
-
11
-
12
-
13
-
14
-
15
-
16
-
17
-
18
-
19
-
20
-
21
-
22
-
23
-
24
-
25
-
26
-
27
-
28
-
29
-
30
-
31
-
32
-
33
-
34
-
35
-
36
-
37
-
38
-
39
-
40
-
41
-
42
-
43
-
44
-
45
-
46
-
47
-
48
-
49
-
50
-
51
-
52
-
53
-
54
-
55
-
56
-
57
-
58
-
59
-
 60
60 -
 61
61 -
 62
62 -
 63
63 -
 64
64 -
 65
65 -
 66
66 -
 67
67 -
 68
68 -
 69
69 -
 70
70 -
71
-
72
-
73
-
74
-
75
-
76
-
77
-
78
-
79
-
80
-
81
-
82
-
83
-
84
-
85
-
86
-
87
-
88
-
89
-
90
-
91
-
92
-
93
-
94
-
95
-
96
-
97
-
98
-
99
-
100
-
101
-
102
-
103
-
104
-
105
-
106
-
107
-
108
-
109
-
110
-
111
-
112
-
113
-
114
-
115
-
116
-
117
-
118
-
119
-
120
-
121
-
122
-
123
-
124
-
125
-
126
-
127
-
128
-
129
-
130
-
131
-
132
-
133
-
134
-
135
-
136
-
137
-
138
-
139
-
140
-
141
-
142
-
143
-
144
-
145
-
146
-
147
-
148
-
149
-
150
-
151
-
152
-
153
-
154
-
155
-
156
-
157
-
158
-
159
 |
 |
