Samsung SWD-M100 User Manual (user Manual) (ver.f7) (English) - Page 76
Require SSL for Outgoing e-mail
 |
View all Samsung SWD-M100 manuals
Add to My Manuals
Save this manual to your list of manuals |
Page 76 highlights
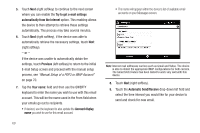
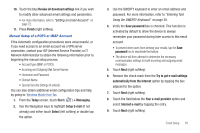
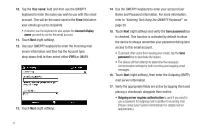
10. Either confirm the outgoing (SMTP) mail server information and field selections are correct, or make changes, and touch Next (right softkey). 11. From this Outgoing (SMTP) screen, confirm the correct SMTP information and then touch the blue Advanced Server Settings link. 12. From this SMTP page, enable/disable any setting you wish by tapping the empty box adjacent to the options. • Require SSL for Incoming e-mail to enable SSL encryption of incoming email (if supported by the mail server). • Require SSL for Outgoing e-mail to enable SSL encryption of outgoing email (if supported by the mail server). 13. Within the Network connection field, tap the drop-down list and select a firewall connection setting by tapping either The Internet (open-no firewall) or Work (behind a firewall). 14. When you have finished making changes, touch Done (left softkey) and then touch Next (right softkey). 15. Continue onto the remaining screens to Change the Send/Receive Schedule settings (page 73) and alter the Download Size settings (page 74). 73 Changing the Send/Receive Schedule Settings 1. From the Today screen, touch Start ( ) > Messaging. 2. Use the Navigation keys to highlight the email account. 3. Touch Menu (right softkey) > Options and tap the Accounts tab. 4. Tap the desired email account from the onscreen list to then launch the Email Setup page. 5. Touch the Send/Receive Schedule link. 6. Select the time interval within the Automatic Send/Receive drop-down field that you would like for your device to send and check for new email. 7. Select the time frame within the Download messages drop-down field to select the age of messages to download from the server. (The longer the time period, the more messages will be downloaded.) 8. Touch the blue Advanced Settings link. 9. Activate/deactivate any settings you wish to change by tapping the boxes adjacent to each option. • Send/receive when I click Send to automatically check for and download new messages whenever you Send a message.
-
 1
1 -
2
-
3
-
4
-
5
-
6
-
7
-
8
-
9
-
10
-
11
-
12
-
13
-
14
-
15
-
16
-
17
-
18
-
19
-
20
-
21
-
22
-
23
-
24
-
25
-
26
-
27
-
28
-
29
-
30
-
31
-
32
-
33
-
34
-
35
-
36
-
37
-
38
-
39
-
40
-
41
-
42
-
43
-
44
-
45
-
46
-
47
-
48
-
49
-
50
-
51
-
52
-
53
-
54
-
55
-
56
-
57
-
58
-
59
-
60
-
61
-
62
-
63
-
64
-
65
-
66
-
67
-
68
-
69
-
70
-
 71
71 -
 72
72 -
 73
73 -
 74
74 -
 75
75 -
 76
76 -
 77
77 -
 78
78 -
 79
79 -
 80
80 -
 81
81 -
82
-
83
-
84
-
85
-
86
-
87
-
88
-
89
-
90
-
91
-
92
-
93
-
94
-
95
-
96
-
97
-
98
-
99
-
100
-
101
-
102
-
103
-
104
-
105
-
106
-
107
-
108
-
109
-
110
-
111
-
112
-
113
-
114
-
115
-
116
-
117
-
118
-
119
-
120
-
121
-
122
-
123
-
124
-
125
-
126
-
127
-
128
-
129
-
130
-
131
-
132
-
133
-
134
-
135
-
136
-
137
-
138
-
139
-
140
-
141
-
142
-
143
-
144
-
145
-
146
-
147
-
148
-
149
-
150
-
151
-
152
-
153
-
154
-
155
-
156
-
157
-
158
-
159
 |
 |
