Sanyo EF60 Instruction Manual, PLC-EF60A - Page 43
Image Adjustment, Image
 |
View all Sanyo EF60 manuals
Add to My Manuals
Save this manual to your list of manuals |
Page 43 highlights
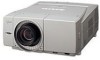
Image Adjustment Image selects image level from Standard, Cinema, Real, and Image 1~10. 1 Press the MENU button to display On-Screen Menu. Spin Menu icons with the Point buttons (7 and 8) or the Control pad and press the SELECT button when the IMAGE icon comes right in front. 2 Move the yellow frame pointer with the Point buttons (e and d) or the Control pad to an image level which you want to select and then press the SELECT button. Image Menu (PC) IMAGE icon For PC Input Standard Normal picture level preset on this projector for PC mode. Real Picture level with improved halftone for graphics. IMAGE 1~10 User preset picture adjustment in IMAGE ADJ. menu (p.44~46). Move the yellow frame pointer to an image level you want to select and then press the SELECT button. Indicates the other items exists below. Image Menu (AV) For AV Input Standard Normal picture level preset on this projector for AV mode. Cinema Picture level adjusted for picture with fine tone. IMAGE 1~10 User preset picture adjustment in IMAGE ADJ. menu (p.44~ 46). Image Adjustment ✔Note: Image 1~10 are common for PC and AV sources, which means 10 memory areas are prepared for PC and AV sources totally. 43
-
 1
1 -
2
-
3
-
4
-
5
-
6
-
7
-
8
-
9
-
10
-
11
-
12
-
13
-
14
-
15
-
16
-
17
-
18
-
19
-
20
-
21
-
22
-
23
-
24
-
25
-
26
-
27
-
28
-
29
-
30
-
31
-
32
-
33
-
34
-
35
-
36
-
37
-
 38
38 -
 39
39 -
 40
40 -
 41
41 -
 42
42 -
 43
43 -
 44
44 -
 45
45 -
 46
46 -
 47
47 -
 48
48 -
49
-
50
-
51
-
52
-
53
-
54
-
55
-
56
-
57
-
58
-
59
-
60
-
61
-
62
-
63
-
64
-
65
-
66
-
67
-
68
-
69
-
70
-
71
-
72
-
73
-
74
-
75
-
76
-
77
-
78
-
79
-
80
-
81
-
82
 |
 |
