Sanyo EF60 Instruction Manual, PLC-EF60A - Page 44
Image Adjust, Contrast, Brightness, Color, Color management
 |
View all Sanyo EF60 manuals
Add to My Manuals
Save this manual to your list of manuals |
Page 44 highlights
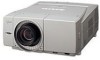
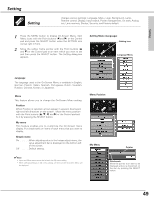
Image Adjustment Image Adjust adjusts Contrast, Brightness, Color, Tint, Color management, Auto picture control, Color temp., Red, Green, Blue, Sharpness, Gamma, Noise reduction, Progressive, and Film; selects Reset and Store. 1 Press the MENU button to display On-Screen Menu. Spin Menu icons with the Point buttons (7 and 8) or the Control pad and press the SELECT button when the IMAGE ADJ. icon comes right in front. 2 Move the yellow frame pointer with the Point buttons (e and d) or the Control pad to an item which you want to adjust. 3 Press the SELECT button to display an adjustment dialog box. Adjust value with the Point buttons (e and d) or the Control pad. Contrast Decrease or increase contrast with the Point buttons (e and d) or the Control pad. (From 0 to 63.) Brightness Adjust image darker or brighter with the Point buttons (e and d) or the Control pad. (From 0 to 63.) Color Lighten or deeper color with the Point buttons (e and d) or the Control pad. (From 0 to 63.) Tint Adjust with the Point buttons (e and d) or the Control pad to obtain proper color. (From 0 to 63.) Color management The Color management function enables you to adjust color level, phase and gamma of the selected spot of the projected image and exchange the original color with the adjusted one. The projector can store up to eight color management data. Color selection Press the SELECT button when Color management is highlighted and then Color management pointer will appear. Move the pointer to a spot which you want to adjust the color of with the Point buttons (e, d, 7, and 8) or the Control pad, and press the SELECT button. The image being projected freezes and Color Selection window will appear. X-axis of COLOR pallet shows Phase and Y-axis, Level. Select a level and phase which you prefer with the Point buttons (e, d, 7, and 8) or the Control pad and press the SELECT button to move the pointer to GAMMA. Select a position of GAMMA which you prefer with the Point buttons (e and d) or the Control pad and press the SELECT button. While adjusting COLOR and GAMMA, the projected image color will change accordingly. ✔Note: • Color and Tint cannot be displayed when PC input source is selected. • Tint cannot be adjusted when the video system is PAL, SECAM, PAL-M, or PAL-N. (p.39) 44 Image Adjust Menu IMAGE ADJ. icon Pointer (yellow frame) Move the yellow frame pointer with the Point buttons (e and d) or the Control pad to an item which you want to adjust. Indicates the other items exists below. Item data Adjust value with the Point buttons (e and d) or the Control pad. Color selection Color management pointer Move the pointer to a spot which you want to adjust the color of and then press the SELECT button. Color Selection window will appear as shown below. Pointer (red frame)
-
 1
1 -
2
-
3
-
4
-
5
-
6
-
7
-
8
-
9
-
10
-
11
-
12
-
13
-
14
-
15
-
16
-
17
-
18
-
19
-
20
-
21
-
22
-
23
-
24
-
25
-
26
-
27
-
28
-
29
-
30
-
31
-
32
-
33
-
34
-
35
-
36
-
37
-
38
-
 39
39 -
 40
40 -
 41
41 -
 42
42 -
 43
43 -
 44
44 -
 45
45 -
 46
46 -
 47
47 -
 48
48 -
 49
49 -
50
-
51
-
52
-
53
-
54
-
55
-
56
-
57
-
58
-
59
-
60
-
61
-
62
-
63
-
64
-
65
-
66
-
67
-
68
-
69
-
70
-
71
-
72
-
73
-
74
-
75
-
76
-
77
-
78
-
79
-
80
-
81
-
82
 |
 |
