Sanyo EF60 Instruction Manual, PLC-EF60A - Page 46
Progressive, Noise reduction, Gamma, Store, Reset, Exits Image Adjust menu.
 |
View all Sanyo EF60 manuals
Add to My Manuals
Save this manual to your list of manuals |
Page 46 highlights
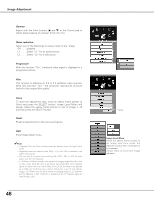
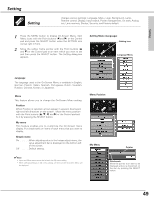
Image Adjustment Gamma Adjust with the Point buttons (e and d) or the Control pad to obtain better balance of contrast. (From 0 to 15.) Noise reduction Select one of the followings to reduce noise of the image. Off . . . .disabled L1 . . . . .Select "L1" for an active picture. L2 . . . . .Select "L2" for a still picture. Progressive With this function "On", interlaced video signal is displayed in a progressive picture. Film This function is effective on 2:3 or 2:2 pulldown video sources. With this function "On," the projector reproduces pictures faithful to the original film quality. Store To store the adjustment data, move an yellow frame pointer to Store and press the SELECT button. Image Level Menu will appear. Move the yellow frame pointer to one of Image 1~10 and then press the SELECT button. Reset Reset all adjustments to their previous figures. Quit Exits Image Adjust menu. ✔Note: • Progressive, Film, and Noise reduction cannot be displayed when selecting PC input source. • Progressive cannot be selected when 480p, 575p, and 720p is selected in the System menu. (p.39) • Film can only be activated when selecting PAL, NTSC, 480i, or 575i for Video System and "On" for Progressive. • 2:3 Pulldown or Telecine transfer is the process of changing images from film mode to video mode. While film runs at 24 frames per second (fps), NTSC television signals (or video) have a run rate of 30fps so the 24 fps film needs to be speeded up to 30fps and transferred using a proper field pattern to get the best film-like images. 2:2 Pulldown uses the same process of changing images as 2:3 pulldown, but the difference is that 24 fps film is speeded up for PAL television signal (or video) having 25 fps. 46 Store Image Level Menu Move the yellow frame pointer to an image and then press the SELECT button.The confirmation box appears. Select [Yes] to store the image adjusted.
-
 1
1 -
2
-
3
-
4
-
5
-
6
-
7
-
8
-
9
-
10
-
11
-
12
-
13
-
14
-
15
-
16
-
17
-
18
-
19
-
20
-
21
-
22
-
23
-
24
-
25
-
26
-
27
-
28
-
29
-
30
-
31
-
32
-
33
-
34
-
35
-
36
-
37
-
38
-
39
-
40
-
 41
41 -
 42
42 -
 43
43 -
 44
44 -
 45
45 -
 46
46 -
 47
47 -
 48
48 -
 49
49 -
 50
50 -
 51
51 -
52
-
53
-
54
-
55
-
56
-
57
-
58
-
59
-
60
-
61
-
62
-
63
-
64
-
65
-
66
-
67
-
68
-
69
-
70
-
71
-
72
-
73
-
74
-
75
-
76
-
77
-
78
-
79
-
80
-
81
-
82
 |
 |
