Sanyo EF60 Instruction Manual, PLC-EF60A - Page 58
Auto PC adj., Test pattern, RS-232C, USB memory
 |
View all Sanyo EF60 manuals
Add to My Manuals
Save this manual to your list of manuals |
Page 58 highlights
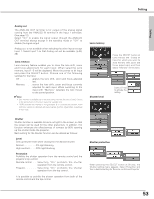
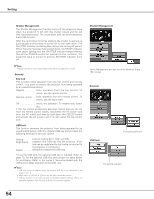
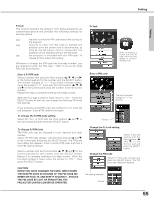
Special Auto PC adj. Select "On" to enable the Auto PC adjust function and "Off" to disable it. Refer to page 30 and 40 for Auto PC adjust function. Test pattern Various test patterns are prepared in this projector allowing users to test the projection. Select one from the following twenty kinds of patterns: Cross 1 (W), Cross 2 (R), Cross 3 (G), Cross 4 (B), Cross 5 (M), Cross 6 (C), Cross 7 (Y), Gradation 1~4, Color, and Flat 1~8. To cancel the Test pattern, press the CANCEL button on the top control or the remote control. RS-232C This feature allows users to set serial communication configuration (baud rate and the projector ID) when connecting several projectors via the RS-232C terminal of the projector. (p13, 78) Baud rate . . . . .9600 / 19200 Projector ID . . .001 ~ 999 Default . . . . .returns Baud rate and Projector ID to factory default setting (Baudrate: 19200, Projector ID: 001) USB memory This feature allows users to store PC mode and Image adjustment data on the optional USB key connected to the projector and recall it from the USB key. PC mode data and Image adjustment data can be stored separately on respective 10 memory areas of the USB key. (PC mode data: mode 1-50 x 10, Image adjustment data: Image 1-10 x 10) (p.43, 47) Save . . . . . .stores the adjustment data on the USB key connected to the projector. Load recalls the stored data. Delete deletes the stored data. To use the USB memory function, the optional USB key (separately provided) is required. Refer to page 73 for the USB key information and contact the sales dealer or service station for purchasing. For further information on USB memory function, refer to the owner's manual that comes with the USB key. ✔Note: • USB memory function cannot be operated without our specified optional USB key. See page 73 for the optional parts. • USB memory cannot be displayed without the optional USB key connected to the projector. (p.13) Test pattern RS-232C USB memory Select Test pattern and then the Test pattern selection box is displayed. Choose one of these patterns with the Point buttons (e and d) or Control pad and press the SELECT button to display the selected pattern on screen. Indicates the other items exist below. The item selected. Move the pointer to one of these and then press the SELECT button and USB Memory Menu appears . 58 To be continued to the next page.
-
 1
1 -
2
-
3
-
4
-
5
-
6
-
7
-
8
-
9
-
10
-
11
-
12
-
13
-
14
-
15
-
16
-
17
-
18
-
19
-
20
-
21
-
22
-
23
-
24
-
25
-
26
-
27
-
28
-
29
-
30
-
31
-
32
-
33
-
34
-
35
-
36
-
37
-
38
-
39
-
40
-
41
-
42
-
43
-
44
-
45
-
46
-
47
-
48
-
49
-
50
-
51
-
52
-
 53
53 -
 54
54 -
 55
55 -
 56
56 -
 57
57 -
 58
58 -
 59
59 -
 60
60 -
 61
61 -
 62
62 -
 63
63 -
64
-
65
-
66
-
67
-
68
-
69
-
70
-
71
-
72
-
73
-
74
-
75
-
76
-
77
-
78
-
79
-
80
-
81
-
82
 |
 |
