Sanyo WF10 Instruction Manual, PLV-WF10 - Page 20
Menu Bar, Before Operation
 |
UPC - 086483050046
View all Sanyo WF10 manuals
Add to My Manuals
Save this manual to your list of manuals |
Page 20 highlights
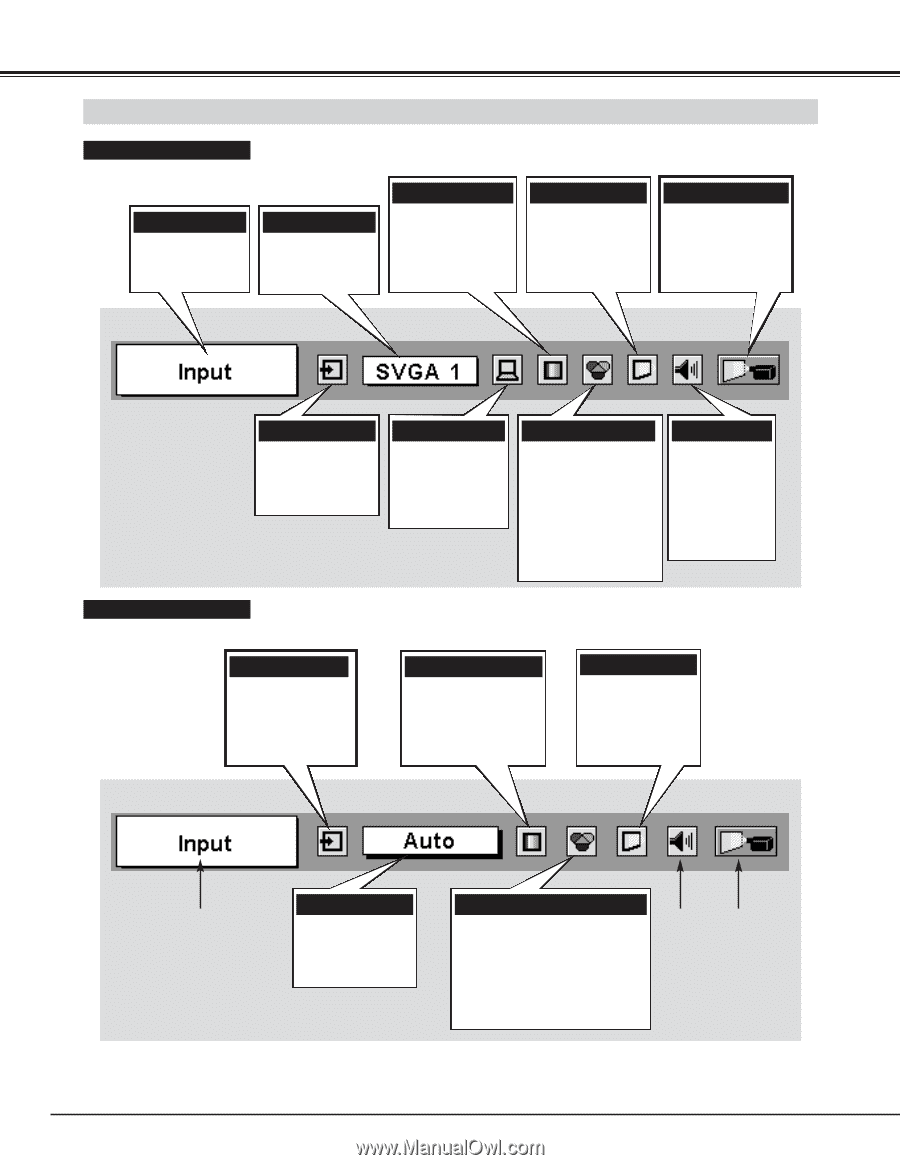
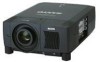
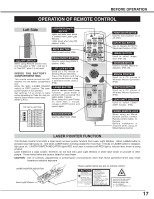
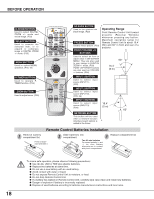
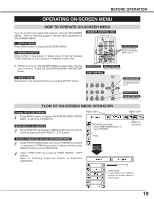
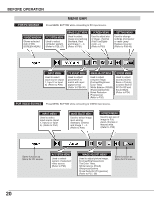
BEFORE OPERATION FOR PC SOURCE MENU BAR Press MENU BUTTON while connecting to PC input source. GUIDE WINDOW Shows selected item of ONSCREEN MENU. PC SYSTEM MENU Used to select computer system. (Refer to P26, 27) IMAGE SELECT MENU Used to select image level among Standard, Real and Image 1 ~ 4. (Refer to P31) SCREEN MENU Used to adjust size of image. [Normal /Full/True/Digital zoom +/-] (Refer to P33) SETTING MENU Used to change settings of projector or reset Lamp Replace Counter. (Refer to P39-42) INPUT MENU Used to select input source (Input 1, Input 2 or Input 3). (Refer to P25) PC ADJUST MENU Used to adjust parameters to match with input signal format. (Refer to P28-30) IMAGE ADJUST MENU Used to adjust computer image. [Contrast/Brightness /Color Temp. /White Balance (R/G/B) /Sharpness/Gamma /Noise Reduction /Progressive] (Refer to P32) SOUND MENU Used to adjust sound [volume, Bass or Treble], to select Built-in SP On-Off and Sound Mute. (Refer to P24) FOR VIDEO SOURCE Press MENU BUTTON while connecting to VIDEO input source. INPUT MENU Used to select input source (Input 1, Input 2 or Input 3). (Refer to P34) IMAGE SELECT MENU Used to select image level among Standard, Cinema and Image 1 ~ 4. (Refer to P36) SCREEN MENU Used to set size of image to Full, Zoom, Normal or Natural wide. (Refer to P38) Same function as Menu for PC source. AV SYSTEM MENU Used to select system of selected video source. (Refer to P35) IMAGE ADJUST MENU Used to adjust picture image. [Contrast/Brightness/Color /Tint/Color Temp. /White balance (R/G/B) /Sharpness/Gamma /Noise Reduction/Progressive] (Refer to P37, 38) Same function as Menu for PC source. 20
-
 1
1 -
2
-
3
-
4
-
5
-
6
-
7
-
8
-
9
-
10
-
11
-
12
-
13
-
14
-
 15
15 -
 16
16 -
 17
17 -
 18
18 -
 19
19 -
 20
20 -
 21
21 -
 22
22 -
 23
23 -
 24
24 -
 25
25 -
26
-
27
-
28
-
29
-
30
-
31
-
32
-
33
-
34
-
35
-
36
-
37
-
38
-
39
-
40
-
41
-
42
-
43
-
44
-
45
-
46
-
47
-
48
-
49
-
50
-
51
-
52
-
53
-
54
-
55
-
56
 |
 |