Sanyo WF10 Instruction Manual, PLV-WF10 - Page 39
Setting
 |
UPC - 086483050046
View all Sanyo WF10 manuals
Add to My Manuals
Save this manual to your list of manuals |
Page 39 highlights
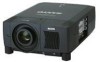
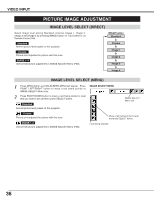
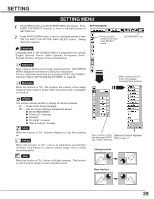
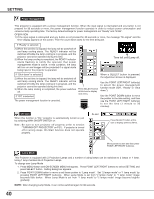
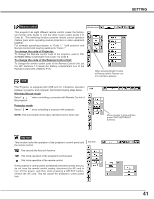
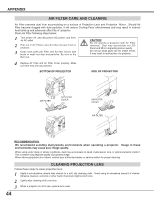
SETTING SETTING MENU 1 Press MENU button and ON-SCREEN MENU will appear. Press POINT LEFT/RIGHT button(s) to move a red-frame pointer to SETTING icon. 2 Press POINT DOWN button to move a red-frame pointer to item that you want to set and then press SELECT button. Setting dialog box appears. Language Language used in ON-SCREEN MENU is selectable from among English, German, French, Italian, Spanish, Portuguese, Dutch, Swedish, Russian, Chinese, Korean and Japanese. SETTING MENU Set a red frame pointer to item and press SELECT button. SETTING Menu icon Keystone When image is distorted horizontally, select Keystone. ON-SCREEN MENU disappears and Keystone dialog box is displayed. Correct keystone distortion by pressing POINT LEFT/RIGHT button(s). Refer to KEYSTONE ADJUSTMENT on page 22. Blue back When this function is "On," this projector will produce a blue image instead of video noise on screen when any input source is unplugged or turned off. Display This function decides whether to display On-Screen Displays. On ··· shows all On-Screen Displays. Off ···· sets On-Screen Displays disappeared except; G ON-SCREEN MENU G "Power off?" message G P-TIMER G "No signal" message G "Wait a moment" message Logo When this function is "On," projector displays our logo when starting up. Ceiling When this function is "On," picture is top/bottom and left/right reversed. This function is used to project image from a ceiling mounted projector. Rear When this function is "On," picture is left/right reversed. This function is used to project image to a rear projection screen. When pressing SELECT button at Language, Language Menu appears. Move a pointer to item Optional Control Number and then press POINT Refer to page 11. LEFT/RIGHT button(s). Ceiling function Rear function 39
-
 1
1 -
2
-
3
-
4
-
5
-
6
-
7
-
8
-
9
-
10
-
11
-
12
-
13
-
14
-
15
-
16
-
17
-
18
-
19
-
20
-
21
-
22
-
23
-
24
-
25
-
26
-
27
-
28
-
29
-
30
-
31
-
32
-
33
-
 34
34 -
 35
35 -
 36
36 -
 37
37 -
 38
38 -
 39
39 -
 40
40 -
 41
41 -
 42
42 -
 43
43 -
 44
44 -
45
-
46
-
47
-
48
-
49
-
50
-
51
-
52
-
53
-
54
-
55
-
56
 |
 |