Schwinn 438 Elliptical Assembly and Owner's Manual - Page 13
Step 6-Attach the Sub Pedal Arm Assemblies and Crank Covers
 |
View all Schwinn 438 Elliptical manuals
Add to My Manuals
Save this manual to your list of manuals |
Page 13 highlights
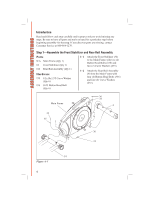
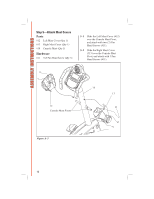
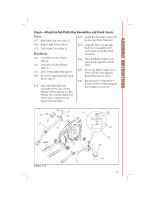
ASSEMBLY INSTRUCTIONS Step 6-Attach the Sub Pedal Arm Assemblies and Crank Covers Parts #17 Sub Pedal Arm Assy (Qty 2) 6-2 Install the Nylon Hex Nut (#34) on the right Pivot Tube bolt. #20 Right Crank Cover (Qty 1) #21 Left Crank Cover (Qty 1) Hardware 6-3 Align the Wheel on the Sub Pedal Arm Assembly (#17) in the track on the Rear Rail Assembly. #32 12.5x25x1.0T Arc Washer (Qty 4) #33 10.2x25x1.5T Flat Washer (Qty 2) #34 10x1.5 Nylon Hex Nut (Qty 2) #41 4x16 Self-Tapping Round Head Screw (Qty 2) 6-1 Place the Sub Pedal Arm Assembly (#17), two (2) Arc Washers (#32), and one (1) Flat Washer (#33) on the right Pivot Tube (#22), as shown in the figure close-up below. 6-4 Place the Right Crank Cover (#20) on the right Pivot Tube (#22). 6-5 Secure the Right Crank Cover (#20) with the Self-Tapping Round Head Screw (#41). 6-6 Repeat steps 6-1 through 6-5 for the left Pivot Tube using the Left Crank Cover (#21). 34 33 17 41 32 34 33 21 17 32 32 22 Track 22 20 Figure A-6 41 17 11
-
 1
1 -
2
-
3
-
4
-
5
-
6
-
7
-
 8
8 -
 9
9 -
 10
10 -
 11
11 -
 12
12 -
 13
13 -
 14
14 -
 15
15 -
 16
16 -
 17
17 -
 18
18 -
19
-
20
-
21
-
22
-
23
-
24
-
25
-
26
-
27
-
28
-
29
-
30
-
31
-
32
-
33
-
34
-
35
-
36
-
37
-
38
-
39
-
40
-
41
-
42
-
43
-
44
-
45
-
46
-
47
-
48
-
49
-
50
-
51
-
52
-
53
-
54
-
55
-
56
-
57
-
58
-
59
-
60
-
61
-
62
 |
 |
