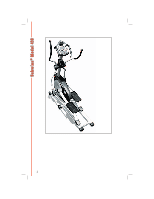
Schwinn 438 Elliptical Assembly and Owner's Manual - Page 8
Assembly Instructions
 |
View all Schwinn 438 Elliptical manuals
Add to My Manuals
Save this manual to your list of manuals |
Page 8 highlights
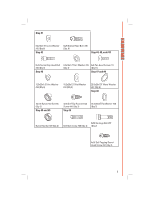
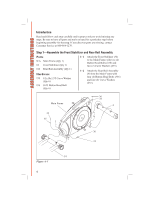
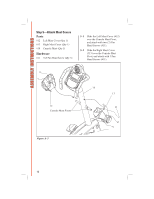
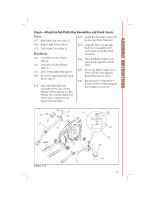
ASSEMBLY INSTRUCTIONS Introduction Read and follow each step carefully and in proper order to avoid missing any steps. Be sure to have all parts and tools on hand for a particular step before beginning assembly for that step. If you discover parts are missing, contact Customer Service at 800-864-1270. Step 1-Assemble the Front Stabilizer and Rear Rail Assembly Parts N/A Main Frame (Qty 1) #4 Front Stabilizer (Qty 1) #14 Rear Rail Assembly (Qty 1) Hardware #35 8.2x18x1.5T Curve Washer (Qty 6) #36 8x25 Button Head Bolt (Qty 6) 1-1 Attach the Front Stablizer (#4) to the Main Frame with two (2) Button Head Bolts (#36) and two (2) Curve Washers (#35). 1-2 Attach the Rear Rail Assembly (#14) to the Main Frame with four (4) Button Head Bolts (#36) and four (4) Curve Washers (#35). Main Frame 36 35 4 36 35 36 35 14 Figure A-1 6
-
 1
1 -
2
-
 3
3 -
 4
4 -
 5
5 -
 6
6 -
 7
7 -
 8
8 -
 9
9 -
 10
10 -
 11
11 -
 12
12 -
 13
13 -
14
-
15
-
16
-
17
-
18
-
19
-
20
-
21
-
22
-
23
-
24
-
25
-
26
-
27
-
28
-
29
-
30
-
31
-
32
-
33
-
34
-
35
-
36
-
37
-
38
-
39
-
40
-
41
-
42
-
43
-
44
-
45
-
46
-
47
-
48
-
49
-
50
-
51
-
52
-
53
-
54
-
55
-
56
-
57
-
58
-
59
-
60
-
61
-
62
 |
 |
