Seagate OneTouch II OneTouch II Installation Guide - Page 36
ready to use
 |
View all Seagate OneTouch II manuals
Add to My Manuals
Save this manual to your list of manuals |
Page 36 highlights
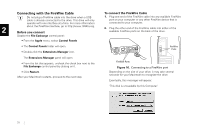
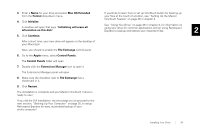
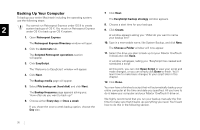
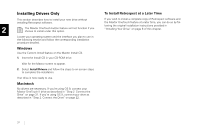
3. Enter a Name for your drive and select Mac OS Extended from the Format drop-down menu. 4. Click Initialize. A window will open that says: 'Initializing will erase all information on this disk.' 5. Click Continue. If you'd like to learn how to set up OneTouch button for backing up your files at the touch of a button, see "Setting Up the Maxtor OneTouch Feature" on page 46 in chapter 3. See "Using Your Drive" on page 38 in chapter 3, for information on using your drive for common applications and on using Retrospect Express to backup and restore your important files. 2 After a short time, your new drive will appear on the desktop of your Macintosh. Now, you should re-enable the File Exchange control panel. 6. Go to the Apple menu, select Control Panels. The Control Panels folder will open 7. Double-click the Extensions Manager icon to open it. The Extensions Manager panel will open. 8. Make sure the checkbox next to File Exchange has a checkmark in it. 9. Click Restart. The installation is complete and your Maxtor OneTouch II drive is ready to use! If you did the Full Installation, we encourage you to proceed to the next section, "Backing Up Your Computer" on page 35, to setup Retrospect Express for easy, automated backup of your entire computer! Installing Your Drive 34
-
 1
1 -
2
-
3
-
4
-
5
-
6
-
7
-
8
-
9
-
10
-
11
-
12
-
13
-
14
-
15
-
16
-
17
-
18
-
19
-
20
-
21
-
22
-
23
-
24
-
25
-
26
-
27
-
28
-
29
-
30
-
 31
31 -
 32
32 -
 33
33 -
 34
34 -
 35
35 -
 36
36 -
 37
37 -
 38
38 -
 39
39 -
 40
40 -
 41
41 -
42
-
43
-
44
-
45
-
46
-
47
-
48
-
49
-
50
-
51
-
52
-
53
-
54
-
55
-
56
-
57
-
58
-
59
-
60
-
61
-
62
-
63
-
64
-
65
-
66
-
67
-
68
 |
 |