Sennheiser ew 300 G2 Instructions for Use - Page 60
Inserting and replacing the batteries, Inserting and charging the accupack, Connecting - manual
 |
View all Sennheiser ew 300 G2 manuals
Add to My Manuals
Save this manual to your list of manuals |
Page 60 highlights
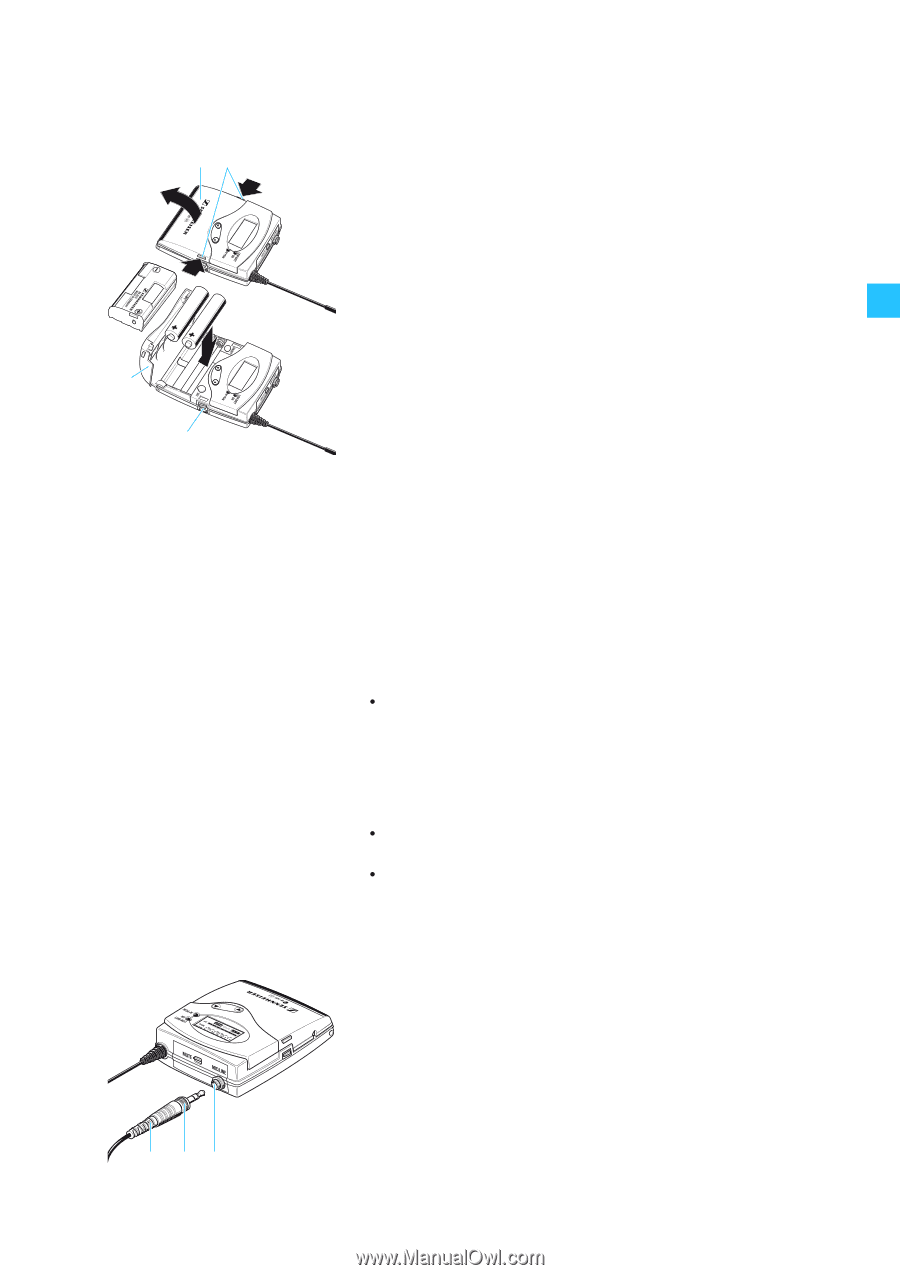
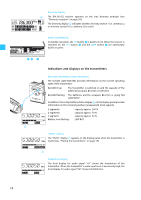
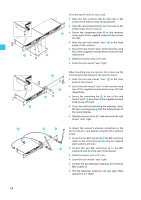
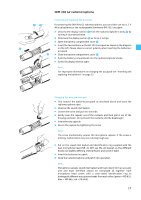
¾µ ¾ ´ ƹ ƺ³ SK 300 G2 bodypack transmitter Inserting and replacing the batteries For powering the SK 300 G2 bodypack transmitter, use two 1.5 V AA size batteries. ̈ Press the two unlocking buttons µ and open the battery compartment cover ¾. ̈ Insert the two batteries as shown in the diagram on the left. Please observe correct polarity when inserting the batteries. ̈ Close the battery compartment. The battery compartment cover ¾ locks into place with an audible click. Inserting and charging the accupack The bodypack transmitter can also be powered via the rechargeable Sennheiser BA 2015 accupack. Insert the accupack into the battery compartment as described above. The transmitter has two charging contacts ´ and a sensing contact on its short sides. The accupack can be recharged while remaining in the transmitter. Insert the transmitter into the L 2015 charger (see operating manual of the L 2015 charger). Note: For accupack operation of the transmitter, only use the BA 2015 accupack In order to ensure optimum operational reliability. For charging the accupack, only use the L 2015 charger. Both the accupack and the charger are available as accessories. The accupack is fitted with an integrated sensor which is - via a third contact - monitored by the electronics of the transmitter and the charger. The sensor is necessary for the following control purposes: y The taking into account of the different voltage characteristics of primary cells (batteries) and accupacks. The battery status indications on the displays, the transmission of transmitter battery status information to the rack-mount receivers and the switch-off thresholds at the end of the operating time are corrected correspondingly. Due to the missing sensor, individual rechargeable battery cells will not be identified as accupacks. y The monitoring of the accupack temperature during charging in the L 2015 charger. y The prevention of improper charging of inserted primary cells (batteries). Due to the missing sensor, individual rechargeable battery cells will also not be charged in the L 2015 charger. Connecting the microphone/line cable The microphone/line input is designed for the connection of both condenser microphones and instruments (e.g. guitars). DC powering of the condenser microphones is via the microphone/line input. ̈ Connect the 3.5 mm jack plug ƹ from the microphone/line cable to the 3.5 mm jack socket (MIC/LINE) ᕡ. ̈ Lock the 3.5 mm jack plug by screwing down the coupling ring ƺ. ̈ Via the operating menu, adjust the sensitivity of the microphone/line input (see "Adjusting the sensitivity (transmitters only)" on page 30). 15
-
 1
1 -
2
-
3
-
4
-
5
-
6
-
7
-
8
-
9
-
10
-
11
-
12
-
13
-
14
-
15
-
16
-
17
-
18
-
19
-
20
-
21
-
22
-
23
-
24
-
25
-
26
-
27
-
28
-
29
-
30
-
31
-
32
-
33
-
34
-
35
-
36
-
37
-
38
-
39
-
40
-
41
-
42
-
43
-
44
-
45
-
46
-
47
-
48
-
49
-
50
-
51
-
52
-
53
-
54
-
 55
55 -
 56
56 -
 57
57 -
 58
58 -
 59
59 -
 60
60 -
 61
61 -
 62
62 -
 63
63 -
 64
64 -
 65
65 -
66
-
67
-
68
-
69
-
70
-
71
-
72
-
73
-
74
-
75
-
76
-
77
-
78
-
79
-
80
-
81
-
82
-
83
-
84
-
85
-
86
-
87
-
88
-
89
-
90
-
91
-
92
-
93
-
94
-
95
-
96
-
97
-
98
-
99
-
100
-
101
-
102
-
103
-
104
-
105
-
106
-
107
-
108
-
109
-
110
-
111
-
112
-
113
-
114
-
115
-
116
-
117
-
118
-
119
-
120
-
121
-
122
-
123
-
124
-
125
-
126
-
127
-
128
-
129
-
130
-
131
-
132
-
133
-
134
-
135
-
136
-
137
-
138
-
139
-
140
-
141
-
142
-
143
-
144
-
145
-
146
-
147
-
148
-
149
-
150
-
151
-
152
-
153
-
154
-
155
-
156
-
157
-
158
-
159
-
160
-
161
-
162
-
163
-
164
-
165
-
166
-
167
-
168
-
169
-
170
-
171
-
172
-
173
-
174
-
175
-
176
-
177
-
178
-
179
-
180
 |
 |