Sennheiser ew 300 G2 Instructions for Use - Page 62
Inserting and replacing the batteries, Changing the microphone head
 |
View all Sennheiser ew 300 G2 manuals
Add to My Manuals
Save this manual to your list of manuals |
Page 62 highlights
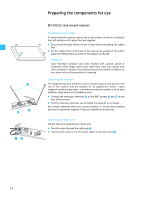
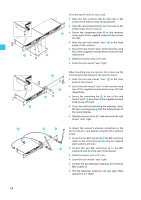
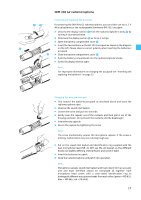
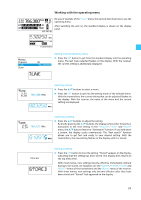
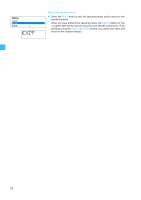
SKM 300 G2 radiomicrophone Inserting and replacing the batteries ´» For powering the SKM 300 G2 radiomicrophone, you can either use two 1.5 V AA size batteries or the rechargeable Sennheiser BA 2015 accupack. ̈ Unscrew the display section ´ from the radiomicrophone's body ᕣ by turning it counterclockwise. ̈ Slide back the display section ´ as far as it will go. ̈ Open the battery compartment cover ƹ. ̈ Insert the two batteries or the BA 2015 accupack as shown in the diagram ´ on the left. Please observe correct polarity when inserting the batteries/ accupack. ƹ ̈ Close the battery compartment cover ƹ. ̈ Push the battery compartment into the radiomicrophone's body. ̈ Screw the display section tight. Note: For important informations on charging the accupack see "Inserting and replacing the batteries" on page 15. Changing the microphone head ̈ First remove the batteries/accupack as described above and leave the radiomicrophone open. ̈ Unscrew the sound inlet basket. ̈ Loosen the screw and put it to one side. ̈ Gently ease the capsule out of the contacts and then pull it out of the housing as shown. Do not touch the contacts and the diaphragm! ̈ Insert the new capsule. ̈ Secure the capsule by tightening the screw. Note: The screw mechanically secures the microphone capsule. If the screw is missing, malfunctions may occur during tough use. ̈ Put on the sound inlet basket and identification ring supplied with the new microphone head (NB: do NOT use the old basket, as the different heads use slightly differing internal foam) and screw it tight. ̈ Insert the batteries/accupack. ̈ Close the radiomicrophone and put it into operation. Note: Microphone capsule, sound inlet basket and foam insert form an acoustic unit and must therefore always be exchanged all together. Each microphone head comes with a color-coded identification ring to distinguish different microphone heads from each other (green = MD 835, blue = MD 845, red = ME 865). 17
-
 1
1 -
2
-
3
-
4
-
5
-
6
-
7
-
8
-
9
-
10
-
11
-
12
-
13
-
14
-
15
-
16
-
17
-
18
-
19
-
20
-
21
-
22
-
23
-
24
-
25
-
26
-
27
-
28
-
29
-
30
-
31
-
32
-
33
-
34
-
35
-
36
-
37
-
38
-
39
-
40
-
41
-
42
-
43
-
44
-
45
-
46
-
47
-
48
-
49
-
50
-
51
-
52
-
53
-
54
-
55
-
56
-
 57
57 -
 58
58 -
 59
59 -
 60
60 -
 61
61 -
 62
62 -
 63
63 -
 64
64 -
 65
65 -
 66
66 -
 67
67 -
68
-
69
-
70
-
71
-
72
-
73
-
74
-
75
-
76
-
77
-
78
-
79
-
80
-
81
-
82
-
83
-
84
-
85
-
86
-
87
-
88
-
89
-
90
-
91
-
92
-
93
-
94
-
95
-
96
-
97
-
98
-
99
-
100
-
101
-
102
-
103
-
104
-
105
-
106
-
107
-
108
-
109
-
110
-
111
-
112
-
113
-
114
-
115
-
116
-
117
-
118
-
119
-
120
-
121
-
122
-
123
-
124
-
125
-
126
-
127
-
128
-
129
-
130
-
131
-
132
-
133
-
134
-
135
-
136
-
137
-
138
-
139
-
140
-
141
-
142
-
143
-
144
-
145
-
146
-
147
-
148
-
149
-
150
-
151
-
152
-
153
-
154
-
155
-
156
-
157
-
158
-
159
-
160
-
161
-
162
-
163
-
164
-
165
-
166
-
167
-
168
-
169
-
170
-
171
-
172
-
173
-
174
-
175
-
176
-
177
-
178
-
179
-
180
 |
 |
