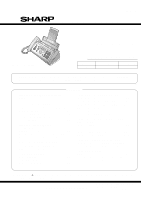
Sharp A260 Service Manual - Page 5
] Quick setup guide, 3] Transmittable documents, 4] Installation - ux manual
 |
UPC - 074000033733
View all Sharp A260 manuals
Add to My Manuals
Save this manual to your list of manuals |
Page 5 highlights
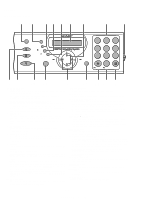
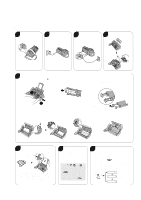
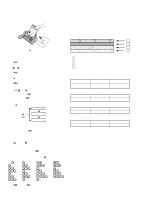
[3] Transmittable documents Refer to the service manual of UX-P100U. UX-A260U [4] Installation Refer to the service manual of UX-P100U. [5] Quick setup guide 1 Connect the handset and place it on the handset rest. Note: To enter your name and fax number and set the date and time so that they appear at the top of each fax you send, see pages 17 - 20 of your operation manual. 2 Plug the power cord into a 120 V grounded outlet. 3 Connect the telephone line cord to the TEL. LINE jack and a wall telephone jack. 4 Attach the paper tray and document support. TEL.LINE 5 Load the imaging film. 1. Open the operation panel (press 1 ). 2. Remove the imaging film from its packaging. Cut the band that holds the rolls together. 2 Click! Note: If the support does not go in, turn it over. 3. Insert the green gears. IMPORTANT: Do NOT discard the green gears. They are not included with replacement imaging film. 1 slot 1 4. Insert the film into the print compartment. Fit ends of rolls onto hubs Make sure the gears fit into the slots in the ends of the rolls. 2 slots 5. Rotate the front spool as shown until the film is taut. 6. Close the operation panel (press down on both sides to make sure it clicks into place). 6 Load paper. The stack should not be higher than this line Insert the paper print side down. • GENTLY LOAD PAPER INTO THE PAPER TRAY. • D O NOT FORCE IT DOWN INTO THE FEED SLOT. Note: If you loaded legal paper, see page 16 of the operation manual to change the paper size setting to LEGAL. 7 Record an outgoing message (greeting) for TAD mode inviting callers to leave a message. (Note: ìTADî stands for ìTelephone Answering Deviceî.) 1. Press REC/ MEMO , , and . 2. Lift the handset, press START/MEMORY , and speak into the handset. 3. When finished, press STOP . 1 - 3 8 Select the reception mode for incoming faxes and voice calls: FAX mode: The machine automatically answers all calls and begins fax reception. TEL mode: Lift the handset when the machine rings. Press START/MEMORY to begin fax reception. TAD mode: Select this mode when you go out to receive both voice messages and faxes. (Note: To select TAD mode, you must first record an outgoing message.) RESOLUTION/ RECEPTION MODE JAN-01 10:30 TEL FAX TAD JAN-01 10:30 TEL FAX TAD JAN-01 10:30 TEL FAX TAD The arrow in the display points to the selected reception mode.
-
 1
1 -
 2
2 -
 3
3 -
 4
4 -
 5
5 -
 6
6 -
 7
7 -
 8
8 -
 9
9 -
 10
10 -
 11
11 -
12
-
13
-
14
-
15
-
16
-
17
-
18
-
19
-
20
-
21
-
22
-
23
-
24
-
25
-
26
-
27
-
28
-
29
-
30
-
31
-
32
-
33
-
34
-
35
-
36
-
37
-
38
-
39
-
40
-
41
-
42
-
43
-
44
-
45
-
46
-
47
-
48
-
49
-
50
-
51
-
52
-
53
-
54
-
55
-
56
-
57
-
58
-
59
-
60
-
61
-
62
-
63
-
64
-
65
-
66
-
67
-
68
-
69
-
70
-
71
-
72
-
73
-
74
-
75
-
76
 |
 |
