Sharp A260 Service Manual - Page 8
] Diagnostics and service soft switch - fax ux
 |
UPC - 074000033733
View all Sharp A260 manuals
Add to My Manuals
Save this manual to your list of manuals |
Page 8 highlights
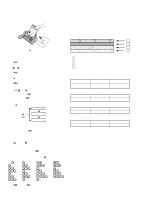
UX-A260U [2] Diagnostics and service soft switch 1. Operating procedure (1) Entering the diagnostic mode Press FUNC → 9 → → 8 → # → 7 , and the following display will appear. ROM Ver. TB40 After 2 sec: DIAG MODE TB40 Then press the START key. Select the desired item with the (Diag•specifications) key or the # key or select with the rapid key. Enter the mode with the START key. FUNC 9 8 7 TB40 DIAG MODE START Soft switch mode ROM & RAM check Aging mode Panel key test Check pattern Signal send mode Memory clear START START START START START START START START Flash memory clear START Flash memory check START Entry data receive START Entry data send START Auto feeder mode START All black print START Shading mode If the diag mode cannot be set, repeat the diag mode operation, performing the following operation. After the power is turned on and "WAIT A MOMENT" is indicated, press the STOP key. STOP KEY "Power ON" + START KEY 2. Diagnostic items Memory clear (Work + Backup) In relation with the process response (request from Production Engineering) "WAIT A MOMENT" clock indication may appear depending on STOP key timing. If the STOP key is held down, "MEMORY CLEAR?" appears. ITEM No. 1 2 3 4 5 6 7 8 9 10 11 12 13 14 Contents SOFT SWITCH MODE ROM & RAM CHECK AGING MODE PANEL KEY TEST CHECK PATTERN SIGNAL SEND MODE MEMORY CLEAR SHADING MODE ALL BLACK PRINT AUTO FEEDER MODE ENTRY DATA SEND ENTRY DATA RECEIVE FLASH MEMORY CHECK FLASH MEMORY CLEAR Function Soft switches are displayed and changed. List can be output. ROM is sum-checked, and RAM is matched. Result list is output. 10 sheets of check patterns are output every 5 minutes per sheet. Panel keys are tested. Result list is output. Check pattern is output. Various signals of FAX communication are output. Back-up memory is cleared, and is set at delivery. Shading compensation is performed in this mode. To check the print head, whole dots are printed over the interval of 2 m. Insertion and discharge of document are tested. Registered content is sent. Registered content is received, and its list is output. Checks flash memory write/read. Checks flash memory clearing. 2 - 2 manuals4you.com
-
 1
1 -
2
-
 3
3 -
 4
4 -
 5
5 -
 6
6 -
 7
7 -
 8
8 -
 9
9 -
 10
10 -
 11
11 -
 12
12 -
 13
13 -
14
-
15
-
16
-
17
-
18
-
19
-
20
-
21
-
22
-
23
-
24
-
25
-
26
-
27
-
28
-
29
-
30
-
31
-
32
-
33
-
34
-
35
-
36
-
37
-
38
-
39
-
40
-
41
-
42
-
43
-
44
-
45
-
46
-
47
-
48
-
49
-
50
-
51
-
52
-
53
-
54
-
55
-
56
-
57
-
58
-
59
-
60
-
61
-
62
-
63
-
64
-
65
-
66
-
67
-
68
-
69
-
70
-
71
-
72
-
73
-
74
-
75
-
76
 |
 |
